
Materials: Frosta Stool, Screws, Screwdriver
Description: These are Frosta stools (a copy of an Alvar Alto stool for Artek) hacked into small coffee tables by moving the legs around (and using it differently than intended). I did not make these, I just saw them outside a place called Tully's Cafe on the corner of Götgatan and Högbergsgatan in Stockholm, and thought I'd submit them.

Not sure if the stools are available at IKEA in the US though? They are called Frosta in Sweden at least.
~ Johan Perjus, Stockholm, Sweden


Back on June 13, 2008, someone posted a piece about using Pax wardrobes as a room divider (Bedroom series #5: Room dividers for your bedroom). My daughter wants to do this, but I'm not sure how to attach the laminate flooring to the backs of the cabinets. Is there any way to find out how this was done? Thanks.
~ John

Materials: 2 cabinet doors from IKEA's scratch-and-dent section
Description: I found two great cabinet doors in the scratch-and-dent section at my local IKEA. They were begging me to take them home!
One of the doors had two glass panels, and the other had one glass panel and one wood panel.
I've been looking for some way to display my son's artwork, so I had an idea.
I painted the bottoms of both pieces with chalkboard paint. I wasn't so sure about painting over the glass, but it worked well.
I put some artwork behind the glass pieces, and then the chalboards at the bottom are for doodling and my son's daily "to do" list.
The cabinet doors look great in his room and they are useful!
~ Laura Stephens, United States

Materials: Asker hanging containers, pretty Japanese paper, Mod Podge, paint brush
Description: Once upon a time these containers looked nice and white. However, after a few months of hanging above our kitchen bench for cutlery storage they became scratched and well, not so nice looking.
Mod Podge
 and Japanese paper to the rescue!
I love this stuff! Now I'm searching the apartment for more Mod Podge candidates. Mod Podge is an all in one glue, sealer and finisher that can be applied to just about anything.
Step 1: Gather your Asker containers and wipe clean.
Step 2: Cut your pretty Japanese paper into small square pieces, or any shape you like. Smaller 1" pieces bend easier around the container's curves.
Step 3: Using the paint brush spread a layer of Mod Podge on the container. Work in small sections so the glue does not dry out.
Step 4: Stick the paper to the container and spread another layer of Mod Podge over the top, and so on until the whole container is covered (I didn't cover the back to save on paper).
Step 5: Once this first coat is dry, I waited until the next day, spread another layer of Mod Podge over the whole container. Just to make sure all the crevices are covered and sealed. Wait another day to dry.
Voila! Pretty Japanese paper patchwork Asker containers!


Sorry, I didn't take before and after photos, but with this hack it's fairly easy to imagine the before.
~ Cindy, Toronto, Canada
OK, I know I’m not the only one who daydreams about winning the lottery. I think about the healthy college and savings accounts we could create, paying off our house and of course, because I’m a house nut and nuts for our house, I think about all the projects we would do around here.
It makes me giddy!
But there’s a little bitty issue. We don’t play the lottery. And like we’d actually win if we did.
DRATS.
So unless money starts falling from the sky, I will stick to dreaming. :)
But I do love thinking about it. What would we do to our house if said cash fell from the sky? It really doesn’t have to be meeeellions. Just a few extra grand. I’m not picky!
I’ve had a mental list for years. You know, just in case. :)
I would start in the kitchen. Because I like our cold food COLD -- call me crazy.
Our fridge looks great:

(Actually, most days it doesn’t look nearly this good. I cleaned for you.)
But the freezer door doesn’t stay shut anymore. Pretty much daily I’ll open it to find a layer of ice forming over everything. And the whole side by side thing is great, if you like to visit the grocery every three days.
Cause that’s all the food that will fit:

Of course I’ve found a way to smash the box of mini ice cream drumsticks in there. ;)
Me at the grocery store:
“Meat to make dinner or ice cream drumsticks? Meat or drumsticks? Hmmmm…drumsticks please.”
My priorities are crystal clear. :)
And you’d think the door not closing is due to my fantastical freezer organization, but it’s not. The food isn’t the issue. The door just doesn’t seal unless we close it just right.
I dream of one of these beauties:

With big, wide drawers for frozen stuff. Big enough for a pizza! Or FIVE. Whatever.
My appliance dreaming continues into the laundry room. Sometimes I feel like the only house left in the country that doesn’t own a set of these babies:

And Ugg boots. The only house without a fancy washer and dryer…and Uggs. :)
But our seven year old set is still kickin’.

Can you tell I cleaned for you in here too? No?
I’ve pretty much given up on this space. :)
I’ve mentioned before we plan on moving our washer and dryer to another spot in the house, and it would be awesome if I had mucho dinero to turn it into this:
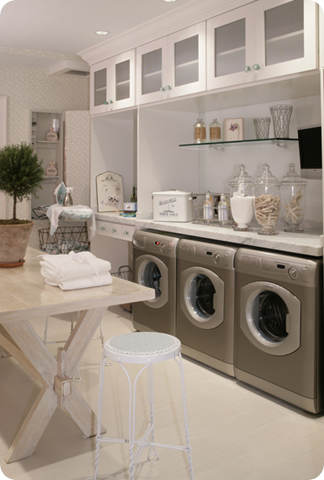
I don’t ask for much people. Three washers? Pushaw…I MUST HAVE THEM.
You know our family room has been a thorn in my side since day one. I dream of pushing out our window wall about five feet:

And installing some beautiful French doors instead:
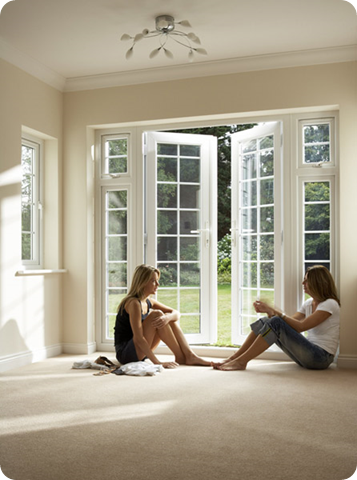
And if I could buy the skinny, I’ll take that too. :)
Since we’d have the doors there (can you tell I’ve thought this all out?), we wouldn’t need the door in the kitchen bay window anymore:

It can get a bit tight maneuvering around our kitchen table, so I have to keep our chairs pushed in all the time to move around comfortably.
But with our money-from-the-sky, I could create my dream bay window, with bench seating all around:
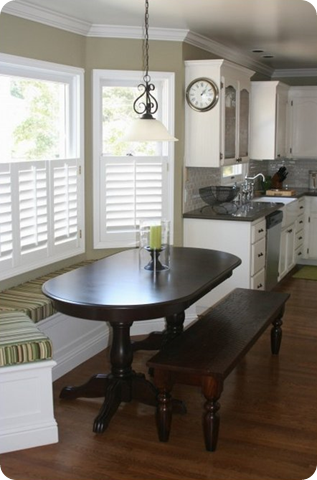
Isn’t that beautiful? Loverly! I can just see it!
And because money wouldn’t really be an issue, let’s throw in a finished basement, just for kicks:
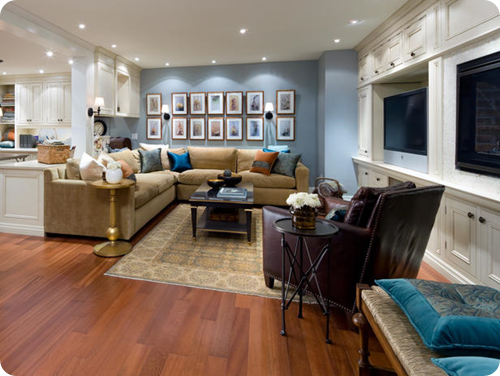
And if Candice herself could come help me decorate it, that would be fun too. ;)
Well, that’s my short list. I haven’t even touched the outside. My outdoor plans include trying to fit a pool in our tiny backyard. I have it all figured out in my head and it totally works. :)
You all know how much I adore our house by the way – I’m full out in LURVE with our home. I appreciate every inch of it, but it never hurts to daydream, right?
So what would be on your short list if you had plenty ‘o cash to spend on your current home? Not a brand new one – the one you’re working with right now. Or have you made one of your daydreams a reality? Do tell! I am SO determined to get our washer and dryer moved – I can barely contain my excitement!!
P.S. You will now have the Barenaked Ladies song playing in your head all day. You. are. welcome. :)

Materials: Malm dresser, wood boards, screws and glue
Description: Malm dresser can be used as a standard changing table and later as a normal chest. With 1m a perfect height to work (baby wrap) and with extra high side panels.
Malm with increased support for standard changing pads. (75 x 85 cm)
Both sides and head are connected with the board back


The cultivation is screwed on an angle on the rear wall of the chest no holes or screws on the top
On the sides, the Ikea trash and Ikea washing basin are appended. (I do not know the name)
If a station is no longer required, the additional bearing surface can be unscrewed easily.

~ Jens, Germany

Materials: Faktum/Abstrakt
~ philipp petersen
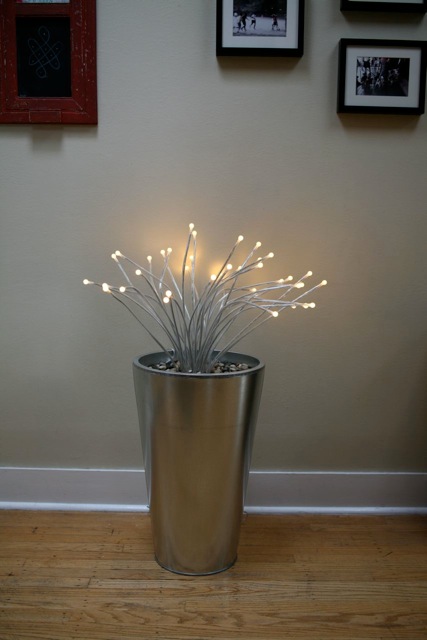
Materials: 23" Huson plant pot - Stranne table lamp - Knaster decorative stones - cardboard box - packing tape
Description: (1) Cut a rectangle of cardboard and place it in the bottom of the pot to raise the height of the lamp.
(2) Put another layer of cardboard flat on top of it for the lamp to rest on.
(3) With the lamp in place, cut a circle of cardboard with a circumference that matches that of the pot just below the inside rim. Cut a square hole in the middle to match the shape of the top of the lamp, where the light stalks emerge.
(4) Bunch up light stalks and insert through through inner hole of cardboard. Tape cardboard to rim with clear packing tape. (Leave a small space to drape electrical cord over rim at back.)
(5) Spread stones around so they cover the cardboard.
(6) Plug in and turn on!
Total cost (US$): $81 (+ tax)

~ Venu Pillarisetty + Vivian van Gelder, Seattle, USA
OK Squeezies. Hang in there with me on this post. I’m going to try to make sense of the way my mind works and the stream of thoughts that go on. Aren’t you so excited to get a look into how my decorating ADD happens? My mind can be a very scary place. ;)
As I mentioned last week, I’ve started a little redo of our playroom/loft. I can’t even pinpoint when it started, but it’s been in the works for months. I’m just finally getting the projects going.
I’ve told you before, I’m nothing if not efficient. :)
Let’s look back at how the playroom looked for a while:

There was a time when I didn’t care for our wall color (the one I had them paint half the house with) – and I thought I had to match everything to it. Hence the reason I used so much red. (I thought it was the only color that worked with the hue of the paint.)
I’ve grown to love the color, and realize it’s an excellent neutral paint. And it’s opened up my world people! I now know I can use more than red to decorate these rooms! ;)
Anyhoo, remember when I told you back here how I took a couple trips to IKEA in a couple weeks? (Gleee!) Well, the reason for my first trip was to pick out this beauty:

It’s the Hemnes dresser and I thought it was going to be perfect for the Bub’s room. I planned to paint it RED (OK, the red isn’t gone for good) to go with his room. Because of that, I got the navy blue version of this dresser, so it would be a good dark base for the red paint.
Well…the reason I loved this dresser was because it had so much storage. What I didn’t realize (even though I measured the space before I got it) was that it’s MASSIVE. I mean, seriously. It’s SO stinking big people.
So I put the MONGO dresser together, and moved it into the Bub’s room, knowing full well it wasn’t going to work. It was too tall and too deep.
Drats.
I was freaking out just a little. What in the world was I going to do with a gigantic navy blue dresser? We certainly don’t need anymore dressers in this house. (You know my dresser obsession.)
And then…it hit me. I could use it in the playroom. Ah HA!! (You can see how I resolved the Bub’s dresser issue here.)
We have had a cheapy laminate TV stand in their for years and years – and a while back I tried painting it. Most of it held up OK, but some parts were flaking off daily:
%5B4%5D.jpg "photo(8)")
I’ve been wanting to toss that thing (it was literally falling apart) forever, so I knew this could work out perfectly. Oh yes, my evil plan always comes together…even when I didn’t have a plan to begin with. And it wasn’t evil.
So I crushed the laminate stand (it. was. AWESOME.) and put the new dresser in it’s spot. LOVE.
Even the insides are adorable:

I changed it up just a bit by adding some fun green knobs (half off!) from Hob Lob:

The blue and green color is so FUN – and will make even more sense in just a minute. :)
Because the dresser is ginormous, it works insanely well for toys and games. Between another purge and this dresser, all of it is hidden away. And there are even empty drawers:

Glorious.
Because the dresser was a lot wider than the old TV stand, it created a few more issues. I had to take down the mirror and the art pad off the walls to accommodate the width of this monster.
And doing so left lots of these:

But we don’t have matching paint to touch them up. And even if we did the wall is about ohhhh…20 feet tall? I’m not painting it, and I don’t know anyone who will. :)
I decided to hang the TV above the dresser, so the need to repaint continued when I went to take the vinyl off the wall:
%5B3%5D.jpg "photo(5)")
NICE. What the ??
Good. Ness. See how these things happen? It’s just a tidal wave.
But tidal waves are good around here. They give me an excuse to get creative. And in my mind, creative usually equals putting wood on our walls. Or mdf, in this case. :)
I used about $40 of the good stuff and did another board and batten treatment on that wall:

Oh my, I never tire of how fresh and crisp and classic it is! Nevah!
The height has no rhyme or reason to it – I just wanted to cover the big holes that showed up when I took down the bottom shelves. ;)
I used this method to fill the other holes, painted a couple coats of primer on the wall, installed the mdf and then gave it a coat of primer. I covered everything one more time with glossy white paint.
It gives the large wall a base and grounds it – which is a very good thing in this space:

By the way, this whole room is still so in between – nothing has been accessorized, so many projects aren’t done. I just couldn’t wait to show ya. :)
Onto the final project (for now), which may have been the first project. I have no idea. It’s all jumbled in my head. Remember that beautiful fabric I used for the kitchen window treatment?
Well this is the space I got it for:

I wanted to inject some more fun, make it fresh -- but keep it an adult space too. This room has morphed from a playroom to a game room over the past year, and I’m going with it.
And the new fabric was the a beautiful change – still lighthearted, but more grown up at the same time.
I don’t know. All I know is I LOVE it.
A couple weeks ago I found a couple of pillows at HomeGoods that happened to have the exact same colors on them:

And the Bub loves them because the one side has pirates, and he’s ALL over pirates lately. They a little whimsy in the room.
So far I’m loving the changes – so fun and bright!:

That new coffee table is for another post – a Craigslist find a few months ago:

It’s Pottery Barn and it’s fantastic! And no, it’s not staying red. :)
I love looking back to see how our spaces have changed – here’s the playroom a couple of years ago:

And the new game room, as it is today:

There are so many things left to do – the chairs will be replaced with our family room sofa…when we get a new family room sofa. :) The lights will come down, and my plan is to put built ins on each side of the windows. (Dad? You there?) The gallery wall is coming soon, and I’m figuring out a couple of other changes as well.
For now, I’m so pleased with how it’s coming together! All of the voices in my head are making sense…finally. ;)
P.S. To see a few of my board and batten tricks, go here to watch a short video. :)

Materials: Pax wardrobes (1 large, 2 medium and 1 small), Various komplement peices and pax bergsbo / frosted glass doors, Martha Stewart living Paint #MSLO29 "glass of milk", poplar moldings 1x2 and 1x3. Crown molding 1x 5/16. Plaster, paint, Hammer, Screwgun, Level, Screw Driver
Description: I converted a basic reach in closet in a small bedroom into two stunning custom closets that look like a $5000 custom "California Closet" systems. One large closet in the bedroom and one small linen closet in the hallway.


The Original closet was 7' wide and 2'6" deep. The bifold door opening was about 4' wide and 80" tall. I completely gutted the closet down to the studs including the walls, ceiling and the framing around the closet door.
I cut out a space in the hallway to the right of the original closet space, framed in and finished a cove 20" wide, 79"tall and 16" deep. In that cove I installed a small pax wardrobe,(pax wardrobe 598.418.77), the wardrobe fits perfectly after i cut off 8" from the back. I finished it by applying a 1x2 poplar molding around the wardrobe, adding a pax bergso / frosted glass door and matching paint framing it in giving it a complete streamline look.
Back to the bedroom, I applied drywall (sheetrock) on the walls and ceiling making the closet space flush with all the room surfaces. The open cove dimensions were 79"w, 95"h (same as ceiling) and 23" deep.
I inserted pre assembled pax wardrobe frames into the cove, one large pax wardrobe frame (700.140.13) and two smaller pax frames (100.140.30). I shimmed the frames so they all lined up evenly and then secured them to the wall.


I made the wardrobes look more complete and custom by adding 1" x 3" poplar molding around the room and under the closet, on the front. Also across the top flush with the closet. I also added the crown molding in the room across the top of the closet achieving the streamline custom look i wanted. The molding was painted with Martha Stewart living Paint #MSLO29 "glass of milk".
All of the moldings were painted with "Martha Stewart" Paint (MSLO29)"GLASS OF MILK", it matches the Pax "bergsbo" doors perfectly creating a dramatic style.
~ Ilir Bitici, Berkeley Heights, New Jersey

Materials: Lack shelf, antique ironing board top, ironing board cover, 2 shelves from "as is" department, 2 bookends, graduated blocks of wood, black lacquer paint, L brackets
Description: I don't like setting up an ironing board and don't like the pull-down models, yet didn't have more than 10 inches clearance on the wall next to my small laundry center.
I found a Lack shelf still in plastic at the PTA thrift shop and, as it was the right size to fit in the space, decided to use it to hide an ironing board.

I found an antique wooden ironing board top made with one center board and two narrow side pieces. I pried off one of the side pieces and cut off the end to yield an ironing board top that would fit under the Lack shelf. I trimmed an ironing board cover and stapled it on the ironing board.
To make legs for the ironing board, I used L brackets to attach shelves to the bottom of the board at an angle. The shelves were from the "as is" department and originally from an unidentified Ikea item. The item is apparently graduated because the shelves' fronts are on a slant, which though not something I planned for works well with the design. I then mounted the Lack shelf to the wall just above the top of the ironing board.
To stabilize the legs I attached wooden bookends to the back of the legs at the bottom and graduated blocks of wood to the front, all painted with black lacquer.
When I need to iron, I pull the board out from under the Lack shelf and slide it over next to the dryer. I keep my iron on top of the dryer to make the set-up all the more handy.
~ Bess, Chapel Hill, NC