
Materials: deep kitchen drawer (any width)
Description: This really just involves adding another support arm to a deep kitchen drawer, that intern holds the ikea drawer dividers high enough to accomodate standard files. This works great considering the deep drawers have a 100 lb. weight limit. The soft closers can be (recommended) used as well. I used wood 2x2's and kerffed them to the original drawer back.

To do again I would probably paint the wood primer gray to mimic the drawer insides. A simple screw through the end of the second support arm holds it to the 2x2. New holes are required (same size as original) for the drawer front end of the support arm.
~ Don Van Dijk, Palm Springs CA

Materials: Varde, Akurum, Lidi and Besta
Description: We had a bare corner in our small kitchen that we couldn't decide how to fill till my husband came up with this idea. He wants to add another cabinet above this one in the future but for now, we have this free standing corner counter cabinet that he customized to our space and needs.
This is a stock Ikea cabinet with a stock door, Besta legs (you'd normally see used to prop up an Expedit bookcase) and a Varde wooden wood block that had to be cut in half and power sanded down to match the smooth, rounded off edges.
I love this cabinet. It's an excellent use of our space, materials and time. This took him all of two hours to put together - most of that time was the power cutting of the counter and then the power sanding of the edges. The cabinet itself took, maybe, 20 minutes to assemble. And the price was right for us, too. I recommend this straight forward, lovely looking hack!
See more of the Akurum corner cabinet.
~ Stacerella

Materials: Akurum cabinets, doors and wall panels; Ekby Järpen floating shelving,
Description: My new loft was basically three blank walls and 15-foot floor to ceiling windows. It sorely needed a focal point, so I designed this combination fireplace/media storage/shelving unit to give it some excitement.

I hired a contractor to build the framework for the fireplace and media center, which forms the base of the unit. A frame consisting of 2x4s was placed lengthwise across the length of the floor. Four Akurum wall fan/refrigerator cabinets were screwed atop the framework, then screwed together. The 2x4 framework formed a base for the cabinet, which was covered with a Perfekt door panel, ripped to length.
The fireplace is essentially a box formed by four 2x4s, approximately ten feet long. The box was mounted to the wall and ceiling, then covered with large Perfekt door panels.

Finally, I ran the electrical wiring for the lighting and the electric fireplace before installing the Ekby floating shelves. I drilled holes in the shelves to route the wiring for the Grundtal lighting disks (I hate seeing wires on the surface of shelving), then mounted the shelves to the base, which had been screwed to the wall.
Finally I built the firebox (more 2x4's!) installed the fireplace, covered the firebox in natural stone tile, and flanked it with mirrors to give the room some depth.

The cabinets hold multiple electronic components, including a whole-house music and lighting control system, as well as the typical odds and ends you find in a living room.

The entire project took about 2 weeks to complete, and cost approximately $7,000, including contractor labor.
~ Vince Edd, Seattle, WA

Materials: Akurum Cabinet, Magasin Dish Drainer, Baskets (possibly Branas) Duktig Play Sets, Non-Ikea parts: an old entertainment center and an old table which we disassembled for wood and parts, some brass fittings from a reuse center, paper 'tiles' created on Photoshop with a disk from the Rijksmuseum
Description: My daughter and I wanted to make my granddaughter a play kitchen similar to those posted here before. Then, we saw a picture of Monet
We began with 2 Akurum cabinets from the As Is section. We used one on its side as the base for the range and sink. The second, which looks upright but is actually an over-the-refrigerator cabinet on it's side, became the refrigerator, with metal in/out trays for shelves.
We used wood from the entertainment center and some other scraps to form the interior section (stove basket shelves and under the sink). We had a plywood back cut to size at a hardware store. The feet on the refrigerator are cut down from the entertainment center. We added molding on the door and a handle from the reuse center.

I cut down a Magasin Dish Drainer and painted it white for above the sink. We spray painted several Duktig sets with copper paint for the batterie de cuisine. And we used Ikea baskets (I can't find the exact model) as the drawers.
The delft 'tile' backsplash is paper. The images of tiles are from a book and cd called 'Traditional Dutch Tiles Design
The gold legs supporting the top piece are from a broken old table.
The 'country sink' is a salad bowl.
We bought some brass findings from a reuse center.
And we painted everything.
There are more details at my blog: Part 1 and 2.
~ Caro Style, Near Boston

Materials: Akurum and false drawer hardware
Description: Not a huge hack but with my last cabinets, I was sick of cookie sheets, thin pans and cutting sheets sliding diagonally in the base cabinet. They take up more room than necessary and also made it more difficult to find the item I needed. For $8, I used the false drawer hardware to make a divider in the cabinet. Works great.
~ Kim, Boston

Materials: Faktum (Akurum) 5 drawer base cabinet, Faktum pull-out larder cabinet, Applad drawer fronts, Numerar white/aluminium effect worktop, Grip handles
Description: I work from home on my invitation design business Akimbo. Since the office is small we had to make all of the space work hard, which meant a traditional desk didn't fit the bill. Instead, we hit up the Ikea kitchen department for the perfect combo.
The cabinets are designed to be put on feet, making it too high for a desk. However you can't just plonk them straight on the floor (as we were initially intending to do) because the drawers won't open properly. We glued on some timber blocks in each corner of the cabinets to elevate them off the carpet.
Using a benchtop that could be cut to length maximised desk space and ensured a perfect fit. Plus, when we move somewhere larger we only need to replace the top. To prevent the desktop sliding around (but without permanently attaching it) we screwed on a couple of tiny L-shaped brackets.

The drawers on the right contain stationery and my vast array of art supplies. To free up desk space, the pull-out cabinet on the left houses my monster A3 printer, scanner and paper. We attached a magnet so that the drawer can attach to it, otherwise the drawer would just slide in and out when the printer was doing its thing! We drilled holes in the back for cords (making sure they were long enough when the drawer was pulled all the way out), plus holes for ventilation.
I love it and can happily work here all day.
See more of Alicia's desk.
~ Alicia Murphy, Adelaide, Australia

Materials: Akurum high cabinet, Pax Komplement drawers
Description: When we renovated the kitchen, we chose this high cabinet from Ikea because it's wide enough for the microwave but for storage it is terrible. It is too deep and has two big drawers which are again too deep. If you put a can in a drawer you can only see the top of the can! I like organizing but I wasn't about to label all the top of my cans!!!


The solution? Ikea's drawers for the Pax wardrobe system. We bought two big ones and my boyfriend cut them to fit the pantry. Voila! Nice sliding, solid wood drawers and not too high.
See more of the Akurum high cabinet with Pax storage.
~ Louise, Montreal

Materials: Hollviken vessel sink, Billy Bookshelf, Akurum cabinet
Description: We determined we could fit a 1/2 bath in our large master bedroom. I wanted a vessel sink, but we couldn't afford the expensive vessel sinks seen in the modern stores, so we set out to make our own.....hence the very vanity vessel hack.
I connected two Billy birch veneer book shelves in tandem with a piece of extra Billy Book shelf side of wood in between but with the opening opposite each other, this created a nuck on the inside facing the sink to place long items. On the outside, I placed shelving to display items and the one facing the vanity, I placed book shelves too, but I put glass door on it, so that I could place all of my toiletries, etc.


Keys to the hack:
1- securing the bookshelf to the wood piece to the next book shelf
2- finishing the exposed edges with iron-on birth colored wood veneer I found at a local hardware store
3 - left-over travertine tile broken up to form a mosaic pattern on our home made vessel sink-cabinet.
4 - extra birch wood side book shelf found in discount section of Ikea
If I had a do-over, I would have put the short legs on the bottom, but we tried that and it was too tall for me to use.
~ Ikeeea 'cause I-cannaa

Materials: Akurum 12" base cabinet, Rationell 12" drawer (24" deep), Perfekt cover panel for base, Linjar (discontinued) cabinet face/door, iron-on white laminate strip, 24' x 22" galvanized sheet metal, Set of 22" full extension drawer slide ball-bearing hardware, 2 small "U" brackets, package of machine screws with covered nuts, 22" white plastic trim, table saw, & basic carpentry tools.
Description: When I remodeled my kitchen, I ended up with about a 5.5" gap. Unfortunately, IKEA's narrowest base cabinet was 12". At the same time, the 30" door was sold out (Linjar was being discontinued), so I had to buy the 24" door to get the built-in aluminum handles. At IKEA, you've seen the pull-out tall garbage can. This is the same concept, but we have to make the drawer front from the panels.
1. With the Akurum 12", cut the top, back, and bottom pieces. Drill new connector holes that IKEA uses to put their cabinets together.
2. Installed new 5.5" base cabinet as normal.
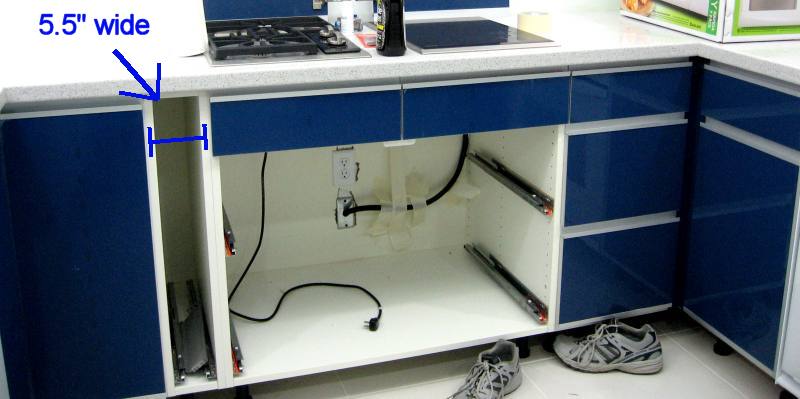


3. 12" Rationell drawers - bottom piece was cut to about 1". Table saw the new groove to slide on the metal sides of the drawer.
4. Install Rationell hardware as normal to cabinet.
5. 24" Linjar door front - Cut 5.5" strip, and pulled off the built-in aluminum handles (both top and bottom).
6. Perfekt 30" base cabinet panel - Cut to "just a shave short" of 5.5".
7. Position the hacked Rationell drawer to the back of the Perfekt panel, lining up where the normal drawer would be attached (remember to add the length of the built-in handles). Draw and drill the needed holes to attach the two pieces. This was hard. You should have a strangely tall drawer front that glides into the cabinet.
8. Adjust the drawer front (normal IKEA adjustments in drawer fronts), draw a line where you will cut off the excess height of the drawer front, remember that you will be adding the built-in hardware. It should be just a few inches.
9. Since the Perfekt panel is slightly thinner than the normal door fronts, be careful that you don't just router a groove in the middle for the built-in handle (that you've cut out from #4). Install the aluminum handle, both top and bottom.
10. I couldn't find metallic iron-on laminate strips, so I settled with white. Remember, the Perfekt panels are slightly thinner than cabinet doors, you will need to shave off about a millimeter after you iron it on. The laminate strips are found at any place like Home Depot or Lowes. OR IF you also purchased white Perfekt Plinths (toekicks) from IKEA, these come with a few strips of white iron-on laminates. I only ironed on one side. The other side was the finished blue edge of the Linjar panel .
11. Cut to 24"H x 22"W of Galvanized sheet metal (Home Depot). Attach per instructions the LEFT side of Liberty Ball Bearing full extension (important) drawer slides (HD), using the package of machine screws and the capped nuts (don't want to scratch knuckles on ends of screws).
12. Using the 2 small "U" brackets (HD), I secured the bottom of sheet metal to the top of the Rationell draw sides. The Liberty drawer slides will be able to screw to the back of the Rationell drawer front. When you slide the draw in and out, it should be in one piece with the sheet metal.
13. Strip of plastic trim (HD) - cut to 22" and glue to top edge of sheet.
Voi-la! Custom spice rack. The bottom drawer had some room for spice packets.
PS: I never hacked the back of the Rationell metal drawer piece. The metal was too thick for my saw, and although I thought about making it out of thin wood, it wasn't worth the effort. I don't store anything that would slide off the back of the drawer. Just spice packets and magnetic spices.
~ Angela, Texas

Materials: 30" Akurum horizontal wall cabinet, reclaimed Douglas fir, MDF panels
Description: I have a custom furniture/cabinetry company in LA, Handmade, that has just launched a line of custom doors, panels and drawer faces for frameless kitchen and bathroom cabinets - anything from the big-box lines, IKEA, you name it. We call the line SEMIhandmade.
In the photos, we took 2 Akurum 30" horizontal wall cabinets, screwed them together, then made doors from reclaimed Douglas fir framing lumber. On the sides are white MDF panels to give the piece a built-in look. We finished everything in low-VOC, water-based lacquer.


See more semihandmade.
~ John McDonald/Handmade, Los Angeles

Materials: (2) Akurum cabinets, (6) casters, plywood, (1) Numerar counter top, (2) Capita brackets, (2) Henriksdal stools, (2) Hemma cord set, (2) Fantsa shade; power drill and drill bits, nuts, bolts, washers, dry wall screws, Liquid Nails
Description: The base of the island is two Ikea cabinets (base Akurum cabinets in Applad white; 2x$105). We screwed the two cabinets together and replaced the legs with six casters ($60). The back side is simply 1/8" plywood painted flat white. One cabinet is used for pantry items. The other holds our recycling bins and garbage; we left the drawer fronts off for easy access.
The island's surface is our main prep surface (Ikea Numerar in black-brown; $59). We used dry wall screws to secure from below.

We also lofted a custom stainless steel shelf (interdynesystems.com; $300) with four Ikea Capita brackets ($20). We used a scrap piece of 1" thick wood on the underside of the hollow shelf and attached it with Liquid Nails
We added two bar stools (Ikea Henriksdal; 2x$80), and this is our eating space. The eating area is complete with two small lights hanging over the island (two Hemma cord sets with red Fantsa shades).
See more of Kate's custom Ikea kitchen.
~ Kate, Lowell, MA

Materials: AKURUM Wall Cabinet, Door, Hinges, and shelves. small fan, computer fan dust cover, cable protector and L brackets.
Description: I needed a place to store all my computer network equipment in one location as all the items, cables, and equipment have taken over my mechanical room.
I looked at other commercial options and the starting price was over $150.00 for a computer rack. I decided that I could pick up a basic wall cabinet and cut holes for the wiring, add a small fan and then mount everything in the cabinet out of sight.


I picked up an AKURUM 21 x 30 wall cabinet, hinges, door, and 2 sets of shelves, and a roll of cable loom from Ikea. I picked up a small fan, fan cover, and L brackets to finish out the hardware.
All of the telephone, video, and computer network cables are run in two holes created in the top of the cabinet with a 2" hole saw. Each of the shelves has 2 "U" shaped holes cut out in the rear to allow for cables to be run and also for ventilation.
On the bottom of the cabinet is one hold for the power cord and the fan is mounted over a 2" hole on the right side with the fan cover screwed to the outside of the cabinet. All of the outlets in my home are wired with the TIA-56A standard so I can connect either a telephone or computer to any of the jacks and just run a patch cord from the patch panel that is mounted under one of the shelves using the L Brackets. In the future, all I need to purchase is a Telephone Module that I will mount in the cabinet and connect to telephone Network Interface Box.
All of the video cables from the home are run into the bottom of the cabinet and can be either of the feeds from my Dish Network receiver.
Currently I have a WD My Book
One of the nice parts of this project is the noise from the equipment is cut down and also dust is kept out of the cabinet with the dust cover that is placed over the fan.
~ Ryan Kelzenberg

Materials: Akurum 21" base cabinets w/ drawers, Abstrakt doors, Svep handles
Description: My wife and I have been wanting to hack Ikea for a long time, in an effort to wrangle our cats' litter and food (not only to keep the house cleaner, but also to keep our dog from grabbing late-night litter snacks). Knowing that cats can get picky when it comes to where they do their business, I wanted to make sure that they wouldn't have any less room to use the box than they had previously with their covered litter pans.
Click to read more>>