
Materials: BORGHAMN-TV bench, 2 IVAR-Cabinets white paint with STRECKET-Handle, VARDE wall cabinet, 2 VYSSA SLUMMER-Mattress for cot + SOFIA Fabric broad-striped
Description: For my son I needed a seat in our very small kitchen. I combined old and new IKEA furniture.


~ Bianca Reinecke, Hannover, Germany

Materials: Ivar shelving units
Description: I work for a small architecture firm in southern California, and last summer I started working from home 3 days a week. I had a small workspace setup prior to that, but it was inadequate for actual day to day work. I needed storage space for books, my computer, stuff, and a big enough desk surface to roll out drawings.

So, I borrowed, and slightly modified the way we set the office workstations up at my firm. We use Ivar's as deskstands with door blanks as the desk surface. The setup I've done at home is similar, but I've used Europly plywood as the desktop. For a small bedroom space, this arrangement works really well.

~ Kyle, Los Angeles

Materials: Bjursta table legs, Ivar chairs
Description:
- Remove legs from cracked wobbly old table
- Replace with bjursta legs but use original antique harware and drill new holes
- Whitewash table and throw on some old boards from the attic
- Sand and varathane entire piece
- Paint dark wood Ivar chairs and antique chairs white
~ Athea Boyes, Britannia Beach Canada

Materials: Ivar
Description: I had a lot of Ivar cabinets assembled in the standard fashion, until one day one of the metal tabs that supports the cabinets gave way.
That's when I decided to mount the cabinets on simple wooden supports. I think it looks much neater. This also turned out to have the added advantage that the cabinets take up less horizontal space.

The stacked cabinets are held in place by dowels fitted in the holes that are already present in the top and bottom of the Ivar cabinets. Metal connector plates were also screwed on the back.
~ Eli, Belgium

Materials: Ivar chair, stretched to 48" with laminated pine board
Description: The idea behind the "multivar" was to create a multi purpose piece using the simple and inexpensive Ivar dining chair side frames. I have seen the Ivar converted into bench already on this site but this is a variation on that. The final dimensions were 48" wide x 18" deep x 28" tall.
My end use was as a tv/media stand but this would also work as entry way bench or low console table with display area or book storage.


The cost was approx. $50 ($20 for the Ivar and $30 in Pine boards). It was fairly simple to to make and took about 2 hours to build. The pine boards were 48" long from the hardware store which dictated the width. They were 24" wide and had to be ripped down to 15.5" (for seat) and 13.5" (for bottom shelf). The remaining pieces were cut int 2.5" (approx.) for the 3 horizontal cross members. The ends of the cross members had tenons cut onto them to fit into the side supports. This was done by tracing the factory ones against the new boards and trimmed with a table saw. This could be done with coping saw too.

Note: the new tenons do not have to be perfect as long as they fit into slot. Carpenter glue was used in the joints along with the stock hardware although the glue was not required. The addition of the lower shelf added a lot of extra bracing and makes the piece very rigid. I left the finish natural with no stain or clear varnish as I prefer the natural look and find it hard to do a good finish on pine. Painting it would probably be best.

Notice that the back rest was cut down in height. I did this for several reasons although it could be left the orig. height too. Firstly I wanted it to be below my window but also found that the height looked awkward and really was not comfortable with the thin flat slats across the back. Here it retains the look of a bench but the back rest really serves no purpose. If you were to use this as a dedicated bench I would increase the width of the 2 back slats to 4" or 4.5" wide and add a cushion or upholstery to them.
See more of the Multivar chair tv bench.
~ Ron Weaver, Sacramento, CA

Materials: IVAR cabinet, 1 Trecket, 4 Besta legs, 4 screws, 2 pieces of wood
Description: I had the IVAR small cabinet fixed to a IVAR unit which I dismantled. I needed a small cabinet unit elsewhere in my kitchen but didn't want to spend too much so I hacked the IVAR.

Paint the Ivar AND the 2 pieces of wood. (better to do this first contrary to what I did)
Use plenty of paint in successive layers.
Drill 4 holes at the bottom of the IVAR. Drill not in the middle of the wood base of the cabinet, but at the bottom of the wood sides to have more wood/support for legs.
Fix each Besta leg per hole.
They'll go a bit out of the size of the cabinet so...:
screw the two pieces of wood at the right size to Ivar.
Fix the Trecket handle and that's it!

Instead of Besta legs, you can also fix castors or other models of legs. I simply took the less expensive as it was the goal of the project to invest a minimum.
~ Jerry, Belgium

Materials: Ivar verticals, Ivar shelves, 6mm dowels, twine, varnish
Description:
When we left the last city we lived in and sold all of our Ikea furniture, I swore "No more pressboard. No more low-end Ikea. Next time, solid wood and antiques only."

Of course, within weeks of the move, I was back inside an Ikea, looking for inexpensive furniture to supplement what was already in our furnished flat - especially bookshelves. But, the furniture we get now will go into the place we eventually buy, and I was determined to stay away from Billy shelves. Nothing against them, really. Just... the pressboard thing. And, I wanted a different look for the office. Did I mention that we're broke from the move. Yeah, that too.
Anyway, we bought two of the tall Ivar verticles and eight shelves.
You may be aware that Ivar shelves have no sides. That means that to use them as bookshelves, you have to put bookends everywhere, resulting in lost space and potential book-spills. So, we needed something to hold the books in. Answer: 6mm diameter wood dowels, cut to 10 1/4" and positioned inside the holes for the shelf supports.

When we bought the shelves, I knew that they would need a cross-brace, but we didn't see the metal ones in the warehouse area of the Ikea and were too tired to keep looking. So, we needed crossbracing to prevent the shelves from racking. Answer: twine knotted and anchored at each back shelf support, crossing behind each shelf. The shelves are now surprisingly laterally stable.

Finally, Ivar shelves are unfinished. It's a look. A look perhaps best suited to dorm rooms, basements and garages. I decided to have some fun and use two colors of varnish, with a coat of gloss over top (I painted our BEKVAM Step Stool the same way).
These shelves will be great for books, and I really like their light, airy look.
~ Deidre Miller, Glasgow, Scotland

Materials: Ivar shelves (4) 33"x20" and (2) 17"x20"; (3) Ivar Side units, cut to correct height; (1) Lagan countertop 50"x26"; (2) Byholma baskets; (1) Gorm height extension post; (1) 39" Observator crossbrace; string and white paint
Description: We had very little countertops at our new home. We had a lot of Ivar shelves (from the shelving unit in the office).


We decided to take our three side units and cut them to the height of our cabinets. We now had 6 pieces - 3 shorter ones lining up with each other, and three longer pieces that lined up. Now we painted all of the Ivar pieces white.
We put all the pieces together and added the crossbrace to strengthen the unit. L brackets were added to the top of the side units. Then we screwed the Lagan countertop onto the L brackets.


As you can see above, I miscalculated how long the countertop would be. So we went back to Ikea and got Gorm pieces and some baskets. We screwed the Gorm extension post and tried on the baskets. (I'm sure there is a better way to attach them. But they aren't going anywhere, so we were satisfied.)
It was really easy to put together. And we are very happy with it overall! It fits all of our appliances, dry food, and pots and pans.
See more of Lauren's chopping block.
~ Lauren Ellis

Materials: Ivar chairs, wood stain, polyurethane finish, jute twine, large tapestry needle
Description: At a local furniture outlet, we snagged a large, clean-lined dining table in a dark-stained wood, but it didn't come with chairs. After looking at many (rather expensive) chair options, we decided to get six Ivar chairs and customize them to fit our needs.
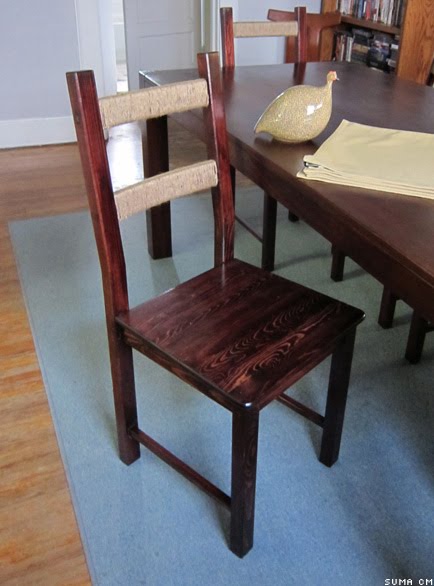
First, we used a dark wood stain and several coats of polyurethane
~ Suma CM, Stamford, CT, USA