
Materials: Rast dresser, silver leaf, paint, crystal knobs
Description: Painted the Rast dresser with black paint, then applied silver leaf glue adhesive to fronts of drawers. Next was to lay silver leaf on the fronts. Seal the dresser with wipe-on poly and add some bling in the form of crystal knobs!


See more silver leaf rast dresser.
~ barbara@hodge:podge, Vancouver, Canada

Materials: Rast Dressers, paint, wood stain, wood filler, drawer handles, drill
Description:
-Two Ikea Rast dressers
-Wood measured to build two shelves
-Two 6"x1"x12' pieces of wood - the surface piece cut in half and stained
-Wood filler to fill in the drawer knob holes
-A quart of hi-gloss Martha Stewart paint in Seal (used two coats)
-Six new drawer handles from Home Depot (you will need to drill new holes for the handles)

~ Nadia Shen, Brooklyn

Materials: Rast Dresser
Description: 1) I bought 2 Rast dressers from IKEA, and assembled the tables, except for the drawers.

2) I primed the 'body' of the dresser {assembled} and the fronts of the doors and then sprayed them using RustOleum's black lacquer spray
3) I took inspiration pics from Dorothy Draper chests online, and blew them up to be able to draw the shape of the inlay on a piece of transparent paper that I cut to be the same size as each drawer. Here is where the measure-twice-cut-once rule really applies! I cut the stencil using an art Xacto knife

4) Using Liquidtex's Iridescent Rich Gold
5) I then put the drawers together on the built shelf, and put in some beautiful bronze ring pulls from Lee Valley Tools.
See more of the DIY Dorothy Draper Chests.
~ Nancy Marcus, Vancouver

Materials: Rast
Description:
I took my idea from "Rast Sensory Table", so I thank its creator.
I bought two RAST nightstand for 9,99 €(one) and hacked them.
I screwed four shorter wooden board in a little armchair, and the longer ones in a little desk!

I also screwed a pink PS VALLO on the right side, very cheap and agreeble look, it contains papersheets, drawing pens, pencils etc.
Funny, cheap and usable!
~ remoxxx

Materials: Rast Table, sturdy string.
Description: I wanted to teach my kids simple loom weaving. I simply turned a Rast bedside table on its side and wrapped sturdy string around the whole thing, on both sides. I used clear tape on the top to keep the tape from shifting around.
~ Ingrid S.

Materials: Seven Rast bedside tabels, wood panels, glue, screws, drill, wood dowels, paint. Optional: Trofast boxes, Mackis drawers.
Description: With our two young kids, we needed storage for toys, books and art supplies. I wanted to match a high and narrow built-in bookcase on the opposite wall. Unfortunately the size of the Trofast cabinet wasn't ideal, and I though it a bit too expensive. So I used five Rast bedtables to make a high and slim floating bookcase where the old mantelpiece used to be.
I attached the five Rast bedtables to each other with wood dowels and glue, then glued and screwed them to a wood panel on the back - since the wall was bent. Hung the whole thing on the wall with several screws and plugs. After some time I added a second smaller cabinet made from two Rast bedtables for extra storage.


The size is perfect for Trofast boxes, and the floating setup makes it light and airy, and easy to clean underneath. Only downside: the Rast tables are not high enough inside to accommodate our collection of foto albums, at least not upright.


(Note: The wall shelves are Fabian shelves, placed in a rhythmic pattern.)
~ G.V.M., The Netherlands

Materials: RAST nightstand, GRUNDTAL towel rail, RIGEL hook, ATTEST knobs, ATTEST handles, LINDSDAL knobs, CAPITA legs
Description: I used two RAST nightstands with multiple other Ikea items to make a child's play kitchen set - a stove/oven with a sink, and a separate refrigerator.

See Becky's blog for detailed list of materials and instructions.
~ GTown
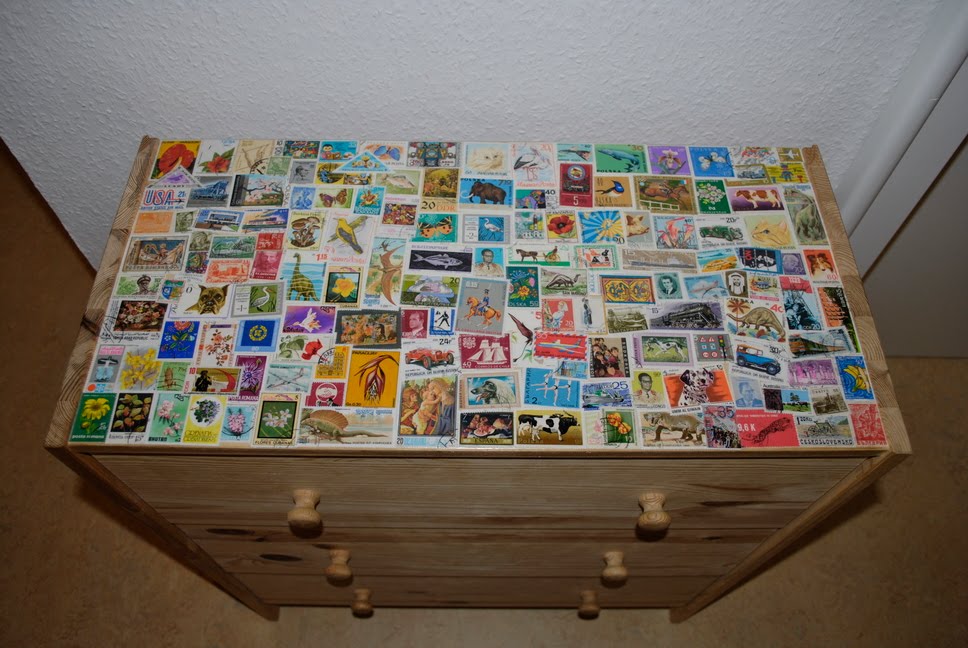
Materials: Ikea chest Rast
Description: I had great collection of stamps from all over the world, but it was only lying around and nobody ever took a look at it.

I glued a compilation of the most interesting stamps on top of the IKEA Rast chest. A nightmare for every serious stamp collector, because I will never be able to take it off again and some of the stamps are really rare. Afterwards I covered the stamps with a layer of plastic film, so I can wipe the chest.
The compilation looks great, the stamps are on display again and my Rast chest is absolutely unique!
It includes stamps from the 60s, 70s and 80s with many animal, flower and dinosaur pictures, from:
All over Europe,
Eastern Germany
Cambodia
Bhutan
Congo
Russia
Togo
Benin
China
Reunion
USA
Paraguay
Yemen and other Middle Eastern countries
Cuba
South Africa
Eastern Europe
Australia
Liechtenstein
and many, many more.
I did this some time ago, but I am going to relocate overseas and I cannot take the chest. I am selling this currently on eBay.
~ Christian Heikaus, Düsseldorf, Germany

Materials: Rast
Description: I was inspired to do this hack after I had seen a similar one here.I ordered ring pulls from Ebay and decided to only paint the front most portion of the drawers white. I left everything else the Dark Walnut stain color from Minwax
1. Assemble the outside of the chest
2. Stain all pieces except the drawer fronts
3. Tape off and paint the drawer fronts
4. Assemble drawers
5. Install drawer guides
6. Install drawer hardware
7. Put it all together

A very chic look for a tiny price!
~ Diana, Worcester, MA