
Materials: RIBBA, Pine boards, black paper
Description: Take a slightly thicker frame type RIBBA, a few bars and construct a box:
The add a back to the frame with black paper and screw on the electronics.
Then, the front passepartout with it and end up with a cardboard tube from wrapping paper serves as a cable channel.


See more of the Ribba Dataport.
~ Andreas K., Germany


Materials: Materials:- 3x Large 50x23cm Ribba Frames, 1x Multi-Colour Dioder set, 1 Bundle of Torka, Kitchen Foil, Sticky Tape, Black Marker Pen, Wood Screws, Electrical Connector Blocks, Paint (optional), Pull Switch (optional). Tools:- Drill and Drill-bits, Electrical Screwdriver, Hot Glue Gun, Tape Measure and Square (or good eyes), Paint Brush (optional)
Description: Having seen the excellent original 'Torked-out Ribba' frame - I decided to make something of a larger feature piece using some large Ribba frames I already had, since I needed a feature for my fire-place.

Ok... my frame is slightly more complex then the previous one so I will include specific instructions for this version. I have attempted to be as consise as possible with the availiable picture limitation - but this is a hard one to describe with words.
Click to read more>>


Materials: RIBBA 50x50, Thinkpad T42, Thick white paper and some pieces of wood.
Description: I used the frame called RIBBA with the size 50x50 cm. There are two models either black or white frame. I selected the black frame for this.
Then as you can see, the inlay have a rectangular cutout and that of course does not fit the laptop screen. To fix this I bought a very heavy paper-sheet (1000g) It's like cardboard, but it's white and stiff 50x70 cm sheet.

The I had an old laptop that I don't use anymore. The battery is completely broken so it can only run if the AC-adapter is always connected. It's an old Thinkpad T42.
Now, we have all the parts lets do it!
Click to read more>>

Materials: Ribba 20x20 shadow box frame and illustration board
Description: As an avid Hot Wheels
 collector I've spent years looking for the perfect way to display my collection. Lightning struck once I discovered the interior depth to be 3cm which is just slightly wider than the width of the average hot wheel.

I constructed a grid using black illustration board available at any art supply store, which I proceeded to cut in interlocking strips eliminating the need for any glue. 1 frame holds 50 cars (depending on allotted space per cell).
~ Chris S, Toronto, Canada

Materials: Ribba-Frame, ATmega328-MCU
Description: This hack modifies a Ribba-Frame into a word-clock that displays the time in words.
1. Drill holes in the back-plate of the Ribba-Frame for the LEDs.

2. Solder the LEDs to a grid where anodes and cathodes get shared in each row and column.

3. Make a proof-of-concept on a breadboard. The rows and columns get multiplexed with shift-registers (instructions can easily be found with Google). The 'heart' of the clock is a ATmega328-MCU. Time is kept by a real-time-clock and updated by the german DCF77-radio-signal.


4. Solder your working clock on circuit boards, place them in the frame, connect the LEDs.
5. Hang it on the wall!
See more of the Ribba word clock.
~ Christian, Germany

Materials: Ribba Picture Ledge
Description: We are renting, so I couldn't attach something to the walls. And we didn't have the space for a big reading nook but I wanted our toddler to be able to see his books and have them be at his height.
I looked through the garage and found 2 IKEA Ribba photo ledges we were not using.
1. I used a scrap piece of wood I found in the garage, that just happened to be the perfect size. I chose this height because I had two shelves - you can choose to make it higher. Your local hardware store may have a scrap wood section which could be a good place to look. They will usually cut to size for a very small fee.
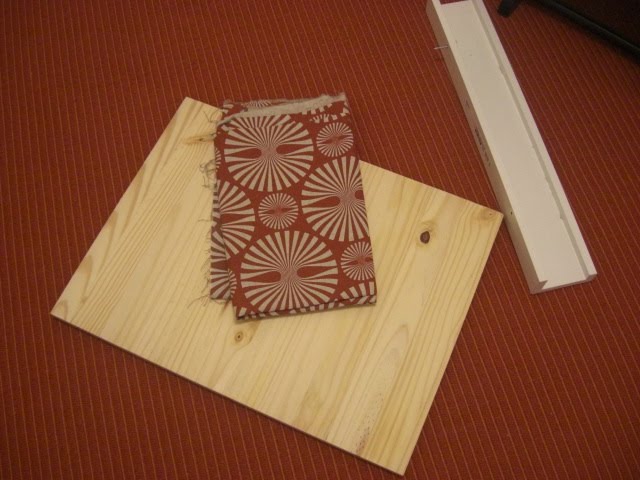
2. One shelf is flush with the bottom to serves as the base - it is free standing on the floor as we can not make holes in the plaster walls. The top shelf I measured by the size of the books it would be holding - works since toddler books are generally short.
3. Used a remnant piece of fabric to cover pine board. Used staple gun to fasten - first the long ends, than the short, pulling taught with each staple. The seam of the fabric I hid under the bottom shelf, so back is seemless. As for the edges {short sides} - cut fabric short, like you are wrapping a present and then fold into itself and staple. You will see the staples on those edges - you can cover with a pieces of ribbon if you choose.
4. With fabric on, I attached first the bottom shelf, using a level to make sure it was even. You may need to choose shorter screws than the hardware that the shelves come with, depending on the width of board you used. Then I attached the top shelf.
Just his height and perfect for 5-6 books, a toddler doesn't need much more.

See more of the toddler bookshelf.
~ Alex T

Materials: 2x Torka bundles, 1x Dioder LED strip set, 2x 50x50x4.5cm - Ribba Frames, Two sided tape, White paint or gesso, An electric drill with ½ inch drill bit
Description: Our apartment needed two things 1.) we needed more light and 2.) we had a large amount of wall space we needed to fill. After going through the Ikea marketplace I came up with a solution to solve both our problems with one project and in looks unique and cool in the process.
To begin, remove the glass, the matte, and the back panel and tape together both the inside frame and the outer frame together to keep them secure. Next, drill thirteen holes evenly spaced and centered on one side of the frame being sure to go through both the outer frame and the inside frame. On the opposite side from where you drilled the holes place two strips of two sided tape and secure two of the four dioder bars connected together with the small short wire links that come with the set. Next Paint or gesso the brown back panel white and let it dry before you reassemble the frame with the glass, the matte, the inner frame.


After you have put the frame back together start placing the Torka through the holes on the top side of the frame. [Note.) before you do this the Torka sticks can be quite long and may need to be cut to size depending on how and where you want to place them in your living space.]

After you are satisfied with your torka design and placement. Now repeat the same steps with the second frame and then plug them in and your are set!
~ Michael Ferster, Calgary, Alberta

Materials: Lack-wall shelf, Ribba-picture ledge (55cm), 4 screws, 4 Alligator-screw anchors
Description: First we sawed the Ribba-picture ledge in three pieces: 25 centimeters from each side. The remaining piece, from the middle, went to garbage bin.

We put the picture ledge pieces against each side of the wall shelf. Then we drilled two holes to each sides, so we get holes to the shelf too. We cut the necks of the screw anchors away and hammered the anchors in to the holes in the shelf. Next we screwed the picture ledge pieces to the shelf. Now we have a nice computer stand. Your keyboard and mouse can be put under the computer stand and then you have more space in your table!
~ Lauri, Finland

Materials: Ribba Frame, Polarvide blanket
Description: My girlfriend keeps on leaving her jewelry on top of our new (and rather expensive :/ ) white lacked piece of furniture. It was time to build a solution to avoid scratches and display jewelry in style. My idea, her perfect execution!
TOTAL cost of the hack: 16 Eur
TIME required: 15 min (at most!)
ITEMS required:
1x RIBBA Picture Frame. There are several sizes and styles, choose the one that fits you best
1x POLARVIDE blanket. Again, there are different sizes.
8x STABILT rubber feet. I think you can get them on IKEA, but this ones are from a hardware store
STEPS
1- Open the picture frame and use the back board to measure the amount of blanket required.

2- Cut a single piece of blanket 2 cm bigger than the back board of the picture frame.

3- Wrap the back of the picture frame with the piece of the blanket and close the frame.

4- Stick some rubber feet so the tray doesn't scratch the surface of your furniture and doesn't slide.

5- Put your day to day jewelry / watches / coins on top and enjoy.
~ pep0, Berlin