
Remember those nekked kitchen windows? I loved how much light they let into our formerly dark space. I have lived, quite happily, with nothing on those windows for at least six months now.
I decided I was going to keep them that way until I found just the right covering, at just the right price, that I loved. If I didn’t find all of the above, they were staying nekked…FOREVA!!!
OK, that was a little intense. But I wasn’t going to force anything. I wanted it to be natural. To flow. Be cool.
And over the past few weeks…it all aligned perfectly. :)
It started when I found this purdy fabric a while back at Calico Corners:

I got it for another room, and LOVE it there. Love. (I’ll show you that soon!) But for some reason, I had a ton extra – I think I had planned on making pillows, but I had enough left for some mongo pillows.
So…the idea hit me. The colors would be so freakin’ pretty in our kitchen! I held it up to a kitchen window and was hooked. It took about 45 minutes with my hemming tape and iron and I had some cute cafe curtains:

I didn’t even line them. I might later, might not. I didn’t make a rod pocket either – I just hung them with the clips using this technique.
I live on the edge people.
Remember the pendant light I installed over the kitchen sink? I had taken that shade off to use in the living room and put another drum shade up. It’s not in the best condition, but it was a $1.99 Goodwill find last year, so I’m making it work!
It had black trim on the top and bottom of the shade, so I just took that off:


You can see how beat up the shade is in this pic, but from the ground it’s not nearly as noticeable. It may not be staying up anyway…but more on that later. :)
Finally, my little window makeover was complete! It’s so fun and fresh and springy!:

I played around with the height, and ended up with something a little longer than half the window. I used a dark tension rod to match the drapery rings, but I may try a white one too. Although I do dig the contrast of the dark rod.
I love the flowers in simple glass bottles on the windowsill:

Best part – the new curtains still let the light in, but if I ever go into freak out mode at night, I can pull easily pull them closed. :)
Awhile back I found a Target rug that pulled in the blues from the family room, and now I couldn’t be happier with how the rug, chairs and drapes are working together:

Because they aren’t right next to each other, (I think) they totally work. They all have the same shades of green and the fabric and rug have the same smoky blue color. All have a supa fun design too. :)
And my covered windows didn’t stop there! A couple weeks ago I came across some clearanced bamboo shades that were the perfect size for the bay windows:

Only $11 each baby!
The shades aren’t the exact tone of those in the family room, so I’ll have to see how they work on a sunny day. Hopefully it won’t drive me nutty.
You wouldn’t think it from this picture, but it was cloudy and rainy today:

Yay!! I still have my light and bright, but with some texture (and privacy if we need it). Can I get a hollaaaa?
I have some ideas in mind to add some color with accessories to the nook too. :)
Only a few more projects to go and our kitchen redo is complete! You know, the one I started almost a YEAR ago? :) Something about that year deadline is getting my booty in gear.
But so far, so good. Me likey:

:)
The cafe curtains are another P. Kaufmann fabric – I wrote down the name and now I can’t find it! I know, hate me. I do know it had the word “citrine” in it, but I can’t find this fabric online. I’ll call tomorrow and get the name to update this post.
So do you have any nekked windows? Like them? Hate them? Waiting for the just-right-treatments to come along? Do tell.
**I found the name! It’s called Spring Vine Opal from P. Kaufmann. And my lovely living room drapery fabric is called Retreat Blue Citrine, also from P. Kaufmann. (I got the names of the fabrics mixed up.)

Materials: BORGHAMN-TV bench, 2 IVAR-Cabinets white paint with STRECKET-Handle, VARDE wall cabinet, 2 VYSSA SLUMMER-Mattress for cot + SOFIA Fabric broad-striped
Description: For my son I needed a seat in our very small kitchen. I combined old and new IKEA furniture.


~ Bianca Reinecke, Hannover, Germany

Materials: Expedit Shelf, Vika Amon Table Top, Capita Legs
Description: So my wife and I were setting up our first home, and it's a small but beautiful white box of a place with a minimalist excuse of a kitchen along one wall of the living room.
We figured we needed some sort of dining table, plus more kitchen counter space, space to work at our laptops, plus general storage... all without taking up precious living room space. What better solution than to use the Expedit bookcase on its side as a storage base for a kitchen/dining counter!
Sure, we've seen lots of hacks with Expedit shelves, Capita legs and various table tops, but I thought I'd just share the little touches that made this project extra special.
1) Ingredients: One Expedit Shelf, assembled. Check!
2) The underbelly of my Vika Amon table top. Note the asymmetrical positioning of the Capita legs, cuz of my cantilevered design!
3) Since I knew the cantilevered top would have to take a lot of stress, I figured that I had to secure the Capita Legs to the Expedit with more than just double sided foam tape. This is a closeup of how each Capita leg base was screwed into the Expedit. I had to chisel away bits of plastic to fit the screw heads. (The bits of 3M tape were just there to help me position the legs accurately.)
4) The metal cap hides the screws completely!
5) The penultimate step... just before popping the table top onto the plastic feet.
6)The gap under the table top is perfect for keeping our 2 laptops and with mice and cables away for mealtimes!
7) The table top floats away from the wall for more comfortable seating (no one likes to be squeezed against the wall). The resultant gap is perfect for keeping table-top accessories like utensils and tissues. Our Nespresso machine lives there now.
8) The finished Kitchen-counter/Dining-Table/Work-Station. 3-in-1! Completed with a few Kassett boxes and Stig stools. The open shelving lets light through to our kitchen, with space to display our books and knick-knacks.
Enjoy!
P.S. The curvy wooden thing is an stool I made as a freshman design+build project in architecture school. Cost me a bomb to fly that back home to Singapore from Pittsburgh, but it is so happy to have the place of honour at our dining table! (And it's way more comfortable than the Stig stools!!)
~ ucn, Singapore

Materials: STOLMEN, MUDDUS table
Description: This is not a real hack, just a new use to an IKEA item, but since I have not seen STOLMEN used in the kitchen, I thought I'd show it to you.
When a whole cupboard full of plates fell from the wall, we knew we had to find another kind of shelf, that is not fixed to the wall. Also we were looking for a small breakfast table for the kitchen.
So we went to IKEA and found STOLMEN. The poles are fixed to the ceiling and the whole structure is really solid. I had always wanted a cookbook stand, and the STOLMEN shoe rack is just perfect. The clothes rail makes a good pole for kitchen rolls, I just fixed it with two of the many allen keys you get from IKEA.
In the future I plan to buy 2 STOLMEN hooks and 2 small metal boards, screw everything together and lay the clothes pole into the hooks (too short now.)
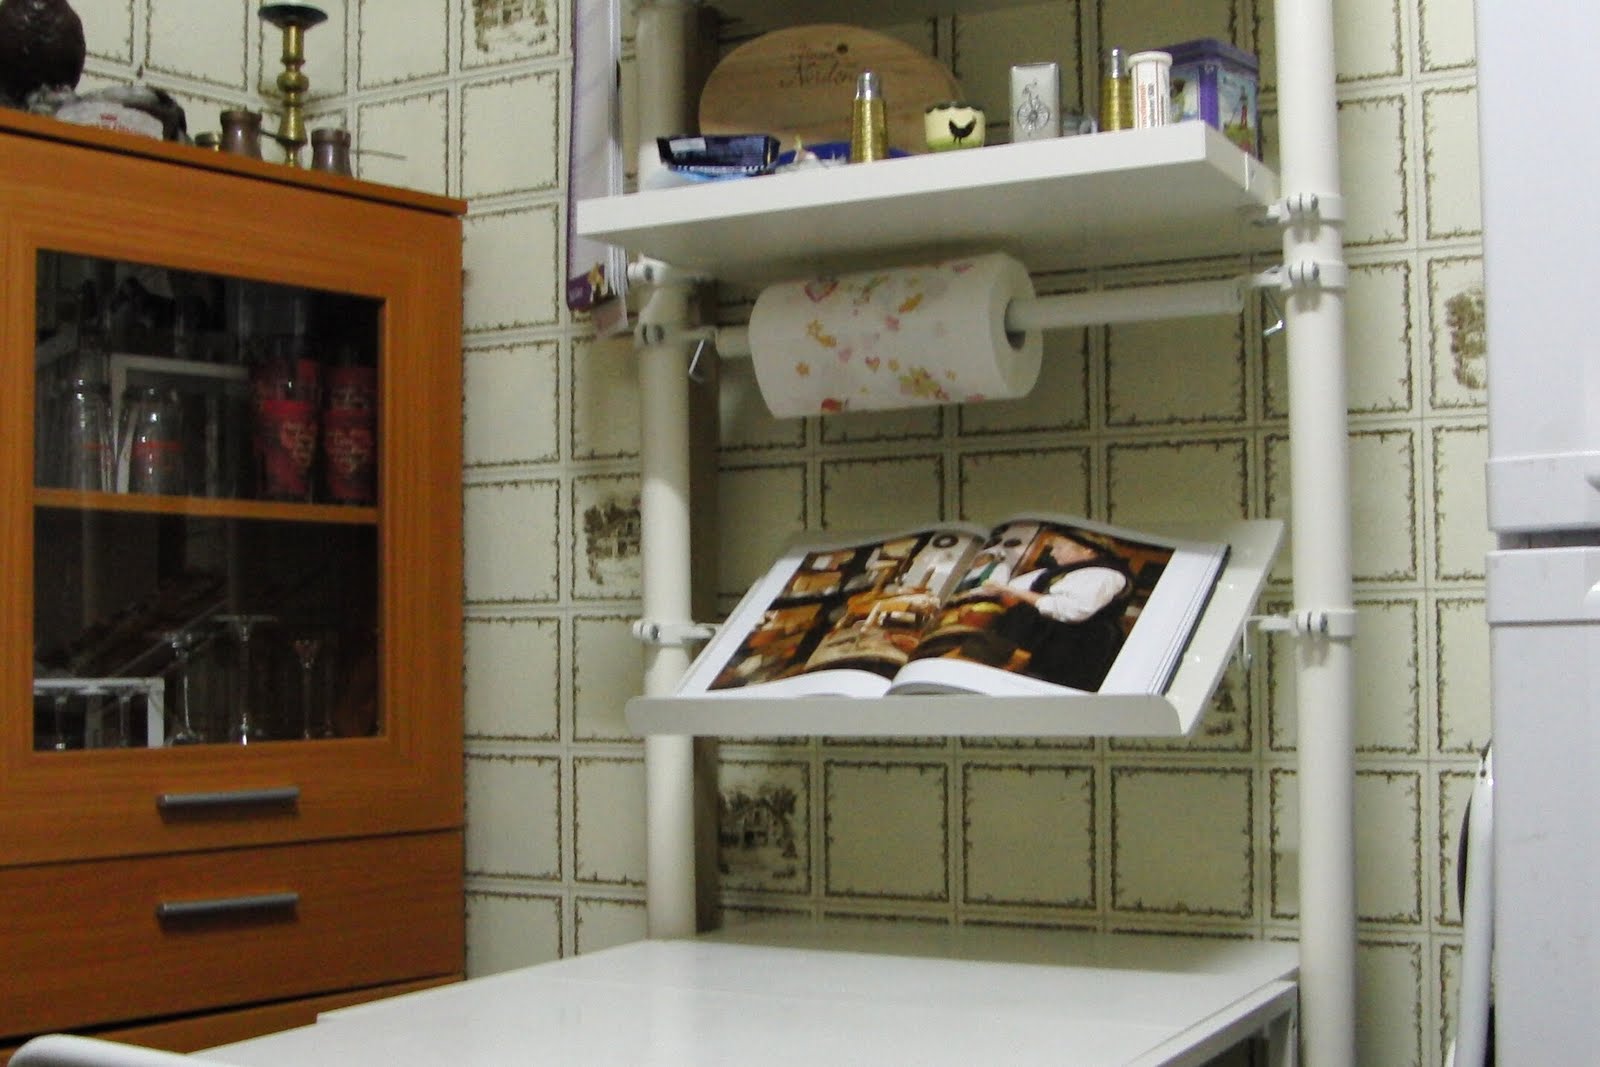
That the MUDDUS table fits perfectly between the two poles is an added bonus that we didn't plan. (Those things never work, when you plan them).
See more of the Stolmen kitchen.
~ Susanne, Antequera, Spain

Materials: 2 tall Ikea cabinet doors about 6 feet found in the as is section for $12 each, 8 foot 3/4 inch metal tubing, angle brackets,woodscrews, saw, drill,hacksaw, level 6 or 8 plumbing fixture wall /floor rings 1/2 inch wood screws, Anchors
Description: Cut Ikea Tall Hard plastic coated doors to length sparing the factory edge for visible ends. One slightly longer for top shelf. Cut tubing to desired height for counter. Hold tube to wall and mark height. With a level, mark on wall shelf height. Attach 3 - 3/4 inch l brackets to underside of shelf with 1/2 inch woodscrews.
Stack all shelves and counter with wall edge lined up. Drill a small hole where you want the post to be through all shelves. Mount Rings on top of and under each shelf/counter with 1/2 inch woodscrews. Mount 3 or more 3/4 inch angle brackets on the underside of each with 1/2inch woodscrews
Mount counter to wall with screws as long as needed and/or with wall anchors. The Counter should really be secure as you will be leaning on it. the first post that you cut will hold the other end while you mount to wall. You might need a hand.
Now that your Counter is mounted to wall place a ring on the floor to prevent post from sliding. this can be secured with screws to floor or you can get a rubber non slip foot to put on the end.

Cut the next tube to height and follow same method as the counter . Mine does not go to ceiling but it could. Upper shelves have the finished side facing down so you don't see the large hinge hardware holes. After a few years of wear you can reverse the shelves and have a new surface.
The shelves I used had a hard plastic coating that seems to be fairly durable. My heights were based on the stools but you could use chairs. Also you could mount a wine glass rack under shelf or Computer keyboard tray under counter.

This was based on a $1200 designer unit I saw.
~ Scott Bourgeois, Vancouver

Materials: Faktum
Description: The video below explains what I did.
~ Pascal Anson

Soooo…remember that little kitchen redo I started oh…almost a year ago? Or so. Yeahhhh.
Well, I’m still working on it. Just slowly. Very, very s.l.o.w.l.y. :)
This weekend I finally I finished up one part of the room – the kitchen table. Hey, it’s something, OK??
To get an appreciation for how far the room has come, let’s look at an old before picture I found shall we?:

I was way into the Tuscan look back then, and I still think it’s lovely. Over the years I’ve just found myself moving toward a fresher, classic feel for this space.
Our table and chairs were passed down from my Dad – and one of the chairs was broken. :) So we lived with three chairs for a long time. Then I found four black chairs at Garden Ridge, by one get one half off. I think they were $70, so it was just over $200 for four new black chairs.
And that change made a HUGE difference in the space. But then American Express handed me some free points (WHOO!) and I was able to make a few more updates.
I painted the bay window back to the Sisal color I LOVE (Ralph Lauren, but Home Depot still has the formula, I believe.) I left the windows nekked and haven’t gone back yet. :) I also added a new light fixture from Home Depot that I spray painted.
I really wanted to get a new kitchen table as well -- I have to admit, I wasn’t crazy about ours for the longest time. But as time went on, I started to appreciate it’s uniqueness and beauty. It’s well made and has a gorgeous shape. Now I realize we’re lucky to have such a unique piece and I absolutely love it.
It’s a pedestal table…with pretty interesting feet:

That I painted black. ;)
I did the first coat months ago and it sat like that since. I finally finished it up this weekend:

I am nothing if not efficient. ;)
I used my go-to black paint – Black Suede from Behr. Love it.
Another recent addition was the cutie little bench at the table. I saw it at HomeGoods a few weeks ago, and because of a picture I saw in a magazine, I knew exactly where it was going:

But I wanted it to match the other chairs (it was brown). It was an easy fix. I took the seats off, spray primed it:

And did a couple coats of black spray paint:

LOVE IT. The Bub sits in this spot and he loves this bench. I gauged how the clean up would be for a while (before I decided to paint it and couldn’t return it), and it’s surprisingly easy to clean. I just wipe down the seats or vacuum out the crumbs.
I didn’t sand the bench or the table base – just painted. I’m wild and crazy like that! Insanity people.
I figure if they get scuffed up, the wood will show through and that’s fine with me. (But the first coat of black on the base has held up GREAT – no poly or anything!)

Thanks to those fine Amex points, last year I was able to get some new dishes and the round rug under the table at Pottery Barn. (The rug is an outdoor rug that’s a “faux” sisal.)

The whole shopping at Pottery Barn for dishes thing was a bit surreal…never done that before and haven’t since. The thrifty in me had to mix in some inexpensive green IKEA plates and bowls though. ;) (The lazy susan and rattan chargers are from IKEA as well.)
Now, the space just feels refreshed, pretty and more my current style. I look back and really love what I did before:

But right now the light and bright has one me over:

What I love is there’s a LOT of black in the space now – black island, black chairs. Black pantry door. But it’s so much brighter. Crazy. (Yes, I know the before shot was at night, but even during the day, the difference is huge.)
But now that I think about it…there are a couple more things I’d like to add to this spot. I have some “art” in the basement I need to get to spray painting!
Am I EVER done? I think not. That’s how I like it.
So, let’s see what you’ve been up to! Link up your before and afters peeps! Remember to link to the html for your post, not your blog.
We had 499 links last month, let’s get to 500 this time! WHOO!! Have fun. :)

Materials: BEKVAM Spice Rack
Description: I wanted spice rack to match my theme in Indian Kitchen. Got it Painted Black and did warli Painting on it.
Warli painting

See more of the Warli spice rack.
~ Anitha Murali, Dubai, UAE

Materials: Varde free standing cabinet
Description:
1) Took the Varde cabinet (great organizer, looks tacky from the back).
2) Added a shoe organizer at the end (so when we come into the kitchen from the outside we leave boots at the door, and grab slippers from the shoe organizer)
3) Covered the whole thing in 1/4 ply and 1 x 3 MDF trim
4) Painted
5) Installed new Ikea wood counter on top (removing worn out thinner one that came with the unit)

~ Jenny Moye

Materials: cover panel, plywoods or cabinet material, IKEA hinges, drawer track and handles
Description: The problem with this space was it was too small for a regular sized IKEA lower cabinet. She really wanted the space for baking sheets and bag storage. We had to custom build two side cabinets with door fronts made from the cover panels that are the same brown stain as the rest of her IKEA kitchen. We ended up using one side hinge drawer from another IKEA cabinet as a track that sat underneath the pullout instead of on the side like IKEA cabinets.

The cover panel was cut down to size and stained on the side that was cut. The cover panel/door was routed to fit the IKEA hinges.

We had the same IKEA handles added to the drawer. Now we have to 7" width drawers that look exactly like IKEA cabinets on the outside.


See more of the slim kitchen cabinet.
~ John Webb Construction and Design, Portland and Eugene, Oregon

Materials: Rationell, hacksaw, epoxy (optional)
Description: This little hack turns a Rationell trash receptacle into an interior cabinet trash holder that can reuse plastic grocery bags.

I used a hacksaw blade to cut at the red lines. Originally, I tried a utility knife but found the plastic was too brittle and had a tendency to suddenly split.
The plastic bag handles hook onto the little "nubs" left on each side and the handles feed into the little triangles at the top.
By cutting away at the body, it allows the bag to expand to hold much more. Optionally, I laid a little epoxy along some of the plastic bends to strengthen it up a bit.


Install it inside a cabinet and start reusing all those plastic trash bags you accumulate at the grocery.
~ Jeff Yu, Naperville, IL

Materials: Rationell drawers, old cabinet, various tools
Description: After my built in fridge died we (me and my wife) bought a new one with no built in.
The cabinet of the fridge was a very interesting place for an Ikea hack.
I was inspired by this but mine was a little bigger.
We bought 5 rationell drawers.
The cabinet is 4 mm wider than drawers so we had to use a 4 mm plywood as a widener on the door side of the cabinet.


If you plan to do a same hacking and you want keep your existing door be VERY careful of the offset of the door when you open it.
That's all, now we are planning to do the same in the pottery cabinet.
Not so difficult but a quite longer (an entire sunday has gone).
~ Giacomo, Milan, Italy