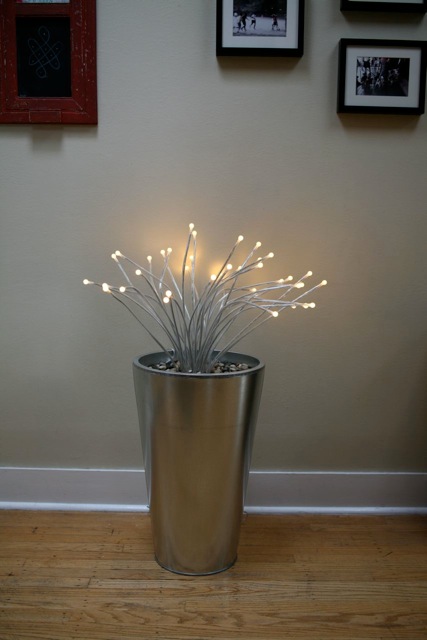
Materials: 23" Huson plant pot - Stranne table lamp - Knaster decorative stones - cardboard box - packing tape
Description: (1) Cut a rectangle of cardboard and place it in the bottom of the pot to raise the height of the lamp.
(2) Put another layer of cardboard flat on top of it for the lamp to rest on.
(3) With the lamp in place, cut a circle of cardboard with a circumference that matches that of the pot just below the inside rim. Cut a square hole in the middle to match the shape of the top of the lamp, where the light stalks emerge.
(4) Bunch up light stalks and insert through through inner hole of cardboard. Tape cardboard to rim with clear packing tape. (Leave a small space to drape electrical cord over rim at back.)
(5) Spread stones around so they cover the cardboard.
(6) Plug in and turn on!
Total cost (US$): $81 (+ tax)

~ Venu Pillarisetty + Vivian van Gelder, Seattle, USA

Helloooooo all! Hope you had a great weekend!
A couple weeks ago I did a little project that only took about five minutes and buck to complete. So of course I had to show you. :)
It all started last month when I finally addressed the massive pile of magazines I’ve been avoiding for months (years?) now.
I saw an idea in one of my old BHG mags and then did a little researching online to see if I could figure out how to do it myself. I didn’t find the how-to, but I did find another inspiration picture:

We have a ceiling fan in our family room and even though I’d prefer something prettier, it’s staying. It’s necessary for the times the oven starts smoking in the kitchen, the smoke alarm is going off, and opening the windows and flapping the kitchen towel just isn’t cutting it. :)
The person that creates the smoke may or may not be me.
I will never tell. :)
The fan is darker brown, which I do like. It has three lights as you can see here:

It’s not bad. Nothing awful. I was just inspired by the photos I found and wanted to try something different.
I decided I was going to do my best to use what I had on hand to change it up.
I started by taking off the glass covers – you just squeeze the metal pieces inside and pull the glass off:

Next up – to figure out how to get my lamp shade to stay on the fan. I had large Goodwill drum shade I planned to use and it was the type with the wire circle at the top of the shade – the kind you have to use with harp. (More on that in a bit!)
So I stood under the fan for about ten minutes, thinkin’ and a thinkin’. I noticed there was a little jobby on the bottom where the pull chain came out. It matched the one on the side:

Because I’ve changed out a meeellion lights in this house, I have plenty of electrical parts laying around. I dug through my stash and found this threaded connector:

The real name of this piece will create some major spam and unwelcome searches if I use it, so for now it’s called a “threaded connector.” ;)
Anyhoo, I knew if I could get it connected to the fan, I could figure this out:

I looked and looked and LOOKED and tried every little trinket I had in my tool box, and nothing worked. Drats.
I was so determined at this point, I was off to the hardware store. :) I looked around for awhile, but couldn’t find the exact piece I needed. Lowe’s Guy and I both spent a good ten minutes looking through the drawers of nuts and connectors, and still couldn’t find anything that worked. And then Lowe’s Guy No. 2 came up to help and suggested I look in…wait for it…the ceiling fan area.
Now, who would have thunk it? :) Bahhhrilliant.
There I found exactly what I was looking for:

Two of these little connectors came in a package for about $1.50. Not bad.
I threaded the connector to the fan, put the longer connector into that one, and then put the hole of the lamp shade over the long piece:

I secured the shade up there with a small nut (picture on the right). It worked perfectly!
The original lamp shade I tried was way too big though, so I took another off a lamp and used that instead (a lovely from Pottery Barn I got with a gift card last year):

Love, love, LOVE.
There’s a few things to consider if you want to try this out – first of which is your ceiling height. The shade hangs lower than the glass shades did, by about five inches I'm guessing? Our ceilings are nine feet, so we still have plenty of clearance. (I’m 5’9”, hubby is 5’11”.)
Something else to consider is your lamp shade. My shade was the type that fits on the lamp with a harp – it’s called a spider fitting:

If you have an uno style shade, or the type that fits right over the lamp socket, you’ll have to use a different method:

I’m sure there’s a way to wire that type of shade up there. But if you are thinking about trying this out, I’d suggest using one with the spider fitting, just because it’s SO easy.
If the bare bulbs showing from underneath the fan are going to bother you, this isn’t for you. That doesn’t bug me one bit, since you only see the light bulbs if you’re right under it:

Honestly, you see less of the bulbs this way than with the original glass shades.
One more thing to consider is the size of your shade. The light bulbs need to be two to three inches from the shade, for safety reasons:

But that also depends on the wattage of your bulbs – ours are 60 watt and we have a dimmer on this light. (And even though our shade is large enough, I had the light on full force for hours the first day, feeling to see how warm the shade was every ten minutes or so.)
It was fine. But I’m a freak like that. :)
It’s odd – it’s makes more of a statement than the glass shades, but I find I notice it less. Maybe it’s because those covers were never my cup of tea. Or it could be because I’m obsessed with drum shades (especially those trimmed out with lovely jute trim).
I don’t know what it is, but I love how it turned out. Especially because it only cost $1.50:

If you don’t have a drum shade, check out Lowe’s! They have a great selection. I always find great options at HomeGoods too, usually for less than $15.
Oh, and it holds up great when the fan is running too. Our fan doesn’t shake much anyway, but it’s totally secure.
So have you doctored up a ceiling fan? With spray paint? New shades? Some bling? :) Have you tried this project? Do share!
Oh, and by the way -- this version:

Is $540. :) Rock. on!!

Materials: Foto lamp (20 inch), FNISS wastepaper basket clear, SPARSAM light bulb, drill, drill bit, utility knife (be careful!)
Description: Remedy the annoying "light bulb in the eye" with a diffuser. All items are from Ikea (minus tools).

1. For the diffuser, use a FNISS plastic wastepaper basket. On the bottom, cut a hole about one and a half inch diameter in the middle. Use a drill and drill bit to remove most of the material by making multiple drill holes. Use a utility knife to finish.

2. Grab the SPARSAM light bulb, place the socket end of the bulb through the diffuser to make sure the bulb will be able to screw into the pendant's socket.

3. Now it's time to install! The beauty of this hack is no hardware is needed. The SPARSAM light bulb actually holds the diffuser in place.
4. Enjoy the upgrade!

Total cost as pictured is:
FOTO 20" pendant lamp = $29.99
FNISS wastepaper basket = $1.99
SPARSAM e26 light bulb = $4.99
~ J.Trawic, Arlington, VA

Materials: Melodi, art podge, Ikea napkins and fabric
Description: I wanted lighting that was custom to each room, and my budget was small, so I got some art podge when I was in Hungary and bought a few Melodi lights for our new place on sale at 5 euros a pop.
For the napkin (blue flowers) lamp I took the decorated part of 3 Ikea napkins and separated them from the rest of the layers of napkin, cut everything into rectangles, and used diluted art podge (with water) to get the napkins in the right shape and glued onto the outside of the Melodi. Then I left it hanging on the shower curtain rod to dry for 24 hours, put another coat of straight art podge over the whole thing and voila, a custom lamp that matches our Ikea bedspread.

The second lamp was done with the kids material you can find in the store because it was for my girls' room. This was only one step, using straight art podge with the fabric and left to dry for 24 hours. The only thing you need to remember is that the light is going to shine through, so if you mind the layered look when the light is on, you will need to do a lot of cutting and puzzle piecing to get the whole lamp covered without much overlap. Enjoy!!
~ Kristin, Athens, Greece


Materials: GRONO Lamp
Description:
Four different mosaics created on the sides of the lamp Gromo.
- preparation stained glass
- glass paste
- grouting


~ Davide Scimeca

Materials: Grono lamp, cotton yarn, crochet needle
Description: I just love my lamp even more now... it's very easy to do if you can crochet.

It's based on this pattern.
~ Ólöf Lilja Eyþórsdóttir, Iceland

Materials: IKEA STOCKHOLM bowl
Description: Last year we redid the bathroom and toilets, and that included the corridor upstairs, which got a place for 3 wall lamps, instead of the hanging lamp that did not illuminate much.
So we spent lots of time looking for lamps (more than 6 months) and never found anything we liked. Even the painter, with whom we have a subscription (he should pass by every month to fix this and that), complains with us that we still did not get lamps...
To put an end to that, during a visit to Ikea, my wife had an Idea(TM - ideas from Ikea) for making a lamp...using a fruit bowl.
So we got one, and I started devising a way of installing it in the very small junction box. The final solution was a very simple 2 long M4x40 screws, which screw directly onto the junction box screw holes, on which the lamp then hangs. I installed a white lamp holder, and here is the result:

You can see the two screws on the top - I want to dip them in tippex or white paint to make them white... - there is actually just one place of all the flowers where it is possible to secure it like that (for this particular size of junction box).
You can also see the black hole of the junction box - that is to be covered with a piece of white rigid plastic.
What you can also see, are the 3 little rubber feet of the fruit bowl...I did not take them out as I am afraid the paint will come out...but they will have to come out sooner or later.
It is difficult to photograph the real effect, but I can assure you that it looks very nice!
See more of the fruit bowl lamp.
~ Alex

Materials: Melodi Lamp, shape print out, stencil sheets, stencil knife, thin brush, acrylic paint, tape
Description: When I bought this lamp, I already knew it was in for some changes. I didn't know exactly what I'd be doing, but then a light bulb went off (pun intended): stenciling!


I found the images that I wanted online, adjusted the sizes and printed them. The next step was to cut out stencils from the printed shapes. Using the inside of the stencil cut out, I used painter's tape to secure the shapes to the inside of the lamp. I then used acrylic paint and a thin brush to paint in the outline.


~ Santa Martin

Materials: Hemma Cord Set, copper wire, blank printed circuit boards
Description: I wanted to create some lighting for my apartment that would have a very geeky feel. After looking around and finding nothing I wanted I decided to create something from circuit boards.
I purchased blank printed circuit boards from ebay.
I used copper wire and insulated wire. (Local hardware store.)
I hooked this all into a Hemma cord set, well 3 of them for the 3 lights.

I wired the circuit boards together with the copper wiring visible as one square and two triangles. I tried using 5 of them but it was very heavy, the 3/4 seemed to be a good look and weight, they are hung with cup hooks using the hooks that came with the cord set.
I then suspended the Hemma fixture inside with insulated wiring. The piece that screws together allows for a good tight hold and the lights have held up very well for several months.


The circuit boards create a lot of visual interest because they have many different levels of light they let through. The light also creates a great visual on the ceiling above them.
Total cost was around $50 with materials left over.
~ Sara Reller

Materials: EFFEKTIV door aluminium/glass No:901.094.54
Description:
* medium density fiberboard with white color on one side 40x80 cm
* LED Light chain approx. 3m, with white LED
* Hot-Glue Pistol
* small electric switch (it should fit into the frame of the door)
* two component epoxy glue


1) Cut out a hole for the switch. The lever should be on the outside, the body of the switch on the inside.
2) Fix the switch in the hole
3) Cut the cable of the light chain. About 1.5m away from the plug.
4) Fix the cable onto the switch, if you are not sure how to install the switch properly call your friendly electrician. Current is dangerous and should be handled careless.
5) Put the light chain on the fiberboard (white side) but leave a 5cm wide boarder
6) You can fix the led chain in every layout you want with your hot glue pistol.
7) Lay your door on to the fiberboard, the LEDs should take place between the the two parts.
8) Fix the door and the board with the two components glue together.
9) Drill two holes with 4mm even placed on the backside of the aluminium frame.
The holes are used to hang up the light just as a picture with frame
~ Peter Zeintl, Austria
Hello there! Can you believe spring is HERE?! Whoo HOO! Hubs grilled out our first steaks of the year tonight and they were SO good. If this keeps up I’ll be picking out flowers for the window boxes any day now.
We had lovely weather -- perfect for spray painting. ;)
We have a light at the base of our stairs that I changed out a few years ago. It used to be the most builder basic brass light, and I replaced it with one that was a little more up to date:

It’s been so long, I have no idea where I got this one – it was most likely Home Depot or Lowe’s. It was waaay better than what we started with, but even with two 60 watt bulbs inside, it barely let off any light.
It drove me a little batty, because this is the one light on our main floor that I have turned on the most – it’s right in the middle of everything.
Well, on a trip to Habitat for Humanity ReStore a few months ago, I found a $5 fixture that had TONS of potential for that spot:

If you have a Habitat ReStore near you, you MUST go! I love that place – but I go (mostly) for the light fixtures. There’s such a great selection of brassiness just begging for a redo!
I got my craft room and master bedroom fixtures there:


Ours is downtown and a drive, so every time we go to the Indy Children’s Museum, we do a little side trip to the ReStore on the way home. ;)
So anyhoo, I was totally thinking of this when I saw my latest find:

That would be the Pottery Barn Gothic Lantern. Mine had more sides, obviously, and it was nine inches wide instead of 12, but it was the same height. And with a cleaning and some spray paint, I knew it had loads of potential.
So I started taking it apart to spray paint it:

It looks intimidating, I know. :) But it’s not – just remember how it started out so you can get it back together again. I take pictures of the details just in case I can’t remember at the end.
Most of the time, you don’t have to take a fixture apart to paint it, but this one had parts inside the glass that I needed to get to.
I wanted to keep the glass, so I started the seriously annoying necessary job of taping off it all off:

I didn’t get it exactly perfect, because I knew I could use my trusty razor blade to scrape off the excess spray paint if needed.
I took everything outside and started spraying light coats of Krylon oil-rubbed bronze (from Walmart, about $4 I think?) on everything. No primer here – since it won’t be handled I don’t worry about that for light fixtures.
It was when I started spraying the glass part above that I realized I needed to cover the glass on the inside of it as well. ARGH. Duh.
So I did an even less perfect job on the inside. ;) Whatev. It worked.
And I continued my coats, taking breaks inside to cuddle with my three guys -- hubby, the Bub and this little bitty one:

:) He’s so stinkin’ sweet. And he’s a cuddle bug for sure.
Anyway, can I say a quick hollaaaaa to the spray paint peeps for making this stuff dry so fast? LOVE it. You need to let it cure for a little while, but especially right over metal, it dries SO fast.
I got it up in no time and I absolutely love it!:

I love how it throws the light on the ceiling too! (See more about my love of painted ceilings here.) And the glass acts almost like mirrors, so I swear it makes those three bulbs even brighter.
It is seriously about ten meeeellion times brighter than the old one. Really, it lights up the whole main floor.
So the next project is to install a dimmer switch. You know I’d love me some dimmers! I’d rather have a bright light I can dim than to have one that’s always dim. ;)
I love our new Pottery Barn-ish light, and I especially love that their version is $270 and mine was $5.
Uh…YESSSSS:

I LOVE it!!
(Ignore the half done photo wall back there. It’s been half done for about a year now. There’s no finish in sight.) :)
Have you found any great ReStore finds? Spray painted a light lately? Any oil-rubbed bronze goodness in your house? For some reason it’s gotten harder to find this spray paint – I’ve found it at True Value stores and Walmart. Have you found it anywhere else?
My friend Melissa found an almost identical $5 light! She took the glass out of hers and I love it!