
First of all, I must thank you for your sweet comments on my kitchen island redo. :) We love it so very much! I promised a how-to on the painting of the cabinets, so here we go…
As I mentioned, it took me almost two and half years to attack this project. Now I know why. :)
Nahhh…it wasn’t that bad.
No really, it was.
You folks who have painted ALL of your kitchen cabinets have a special place in DIY heaven reserved just for you. Seriously.
I started with this:

Once I got the new butcher block counter on, I was all hyped up to get the whole island DONE already. So I plopped down on the floor, took off the doors and pulled out the drawers and started sanding away with my little power sander.
BIG mistake. Oh for all that is good, it created a massive mess. HUGE. And after two sanding sheets and 15 minutes, I had only gotten close to bare wood in a few spots:

After you sand, it’s all misleading because the film it creates makes it look like the finish is actually coming off. Well, it’s not. It’s just spitting dust everywhere:

Sheesh.
Anyway, I gave up on the sander. I wiped the layers of dust away and started priming. I used the B.I.N. primer from Zinsser:

They had me at 45 minutes. Really, I have zero patience for waiting for primer to cure. NONE. (By the way, I had to run EVERY pan through the dishwasher and clean the insides of the cabinets to get all the dust from the sander off. Fun times!)
I did two coats of primer, then four coats of black, (I always use Black Suede from Behr) sanding between each with my 3M sanding pad:

I usually use the sanding blocks, but I’m kind of loving this foamy pad thing.
I think one of most important parts of painting furniture is letting each coat of paint cure, and sanding well between each coat:

You can use a tack cloth to wipe it down, but they give me the HEEBS. So sticky and just gross. Uck. So I use the tried and true wet paper towels and wet rags:

And my very fancy paint trays for painting:

:) Nothin’ but the best!
Because I didn’t have the primer tinted (I plan to use it for other projects as well), I had to do four coats of black.
It was after I painted the trim that I realized I had the same primer, tinted black, in the basement.
AWESOME.
For the doors, I used the process I should have started with from the beginning. I cleaned each one with a TSP spray:

Then just primed with my tinted primer.
NO SANDING MAKES ME HAPPY.
Well, at least one less sanding – I did light sandings between each coat, like I mentioned. Two coats primer, three coats black, sanding between each.
I did the grooves with my Purdy brush first, then a foam roller to do the rest of the cabs:

Because I wasn’t as diligent with my sanding as I should have been, you can see spots in the corners where I used a brush first:

But really…do I care? NO I do not. Like I’ve said before, no one would ever notice it. And if they did, I’d give them a cookie. Then I’d kick ‘em out for noticing.
I kid, I kid!!
I finished the whole thing off with a water-based polycrylic:

I usually use a polyurethane, which is oil-based, but I wanted the water-based for other projects. Regular poly can yellow, which is fine for black and over a dark stain, but not good for lighter painted projects. I quite liked this stuff – it seems to protect just as well, but time will tell.
You need to do a light sanding before your first coats of poly, and then sand lightly between each one. I use foam brushes to apply it.
I chose the satin version and it was WAY glossier than I thought it would be. Be careful with the sheen – you don’t want it to be TOO glossy. Remember glossy shows any imperfections. Flat sheens help to hide them. :)
Oh yeah, and NO, I did not paint inside the doors:

It would really make them look more custom, I know. But that extra hour of work was better spent on another project. Or eating. Sleeping. Anything other than painting. ;)
Was it hard? Not at all. Time consuming? Yes.
When I do projects, I like to be able to stop, clean up everything, and put it all back together when I’m done for the day.
It drove me batty to have the doors and drawers all over the place for two days. But that’s just my thing – if you go into it knowing your kitchen is going to be a hot mess for a few days, you’ll be golden.
Was it worth it? HECK yeah!
Before:
After:

(Sorry for the crappy evening picture!)
Notice the fall stuff is coming out? You know what that means – the basement decrapification is DONE!! Actually, the whole house is pretty much free of STUFF.
And it feels ahhhmazing!
I hope this helps those of you who are thinking about painting your bathroom or kitchen cabinets! It can be done – with a little bit of patience and a whole lot of primer. :)
P.S. Oh yeah…GUESS WHAT?
I am so stinking excited -- next week I’m going to see the new Nate Berkus show, courtesy of my friend Rhoda!! Whoohoo!!! I am so thrilled to take a trip to NYC with some of my favorite bloggy girls – some I’ve already met, some I haven’t.
Email me if you live near NYC and you can meet us out there! :) If you’re going, holla at me!
Welcome to what I like to call
THE
LONGEST
PROJECT
IN
THE
HISTORY OF MAN.
OK, a little dramatic, but really. It took forever. Serious.
Serious.
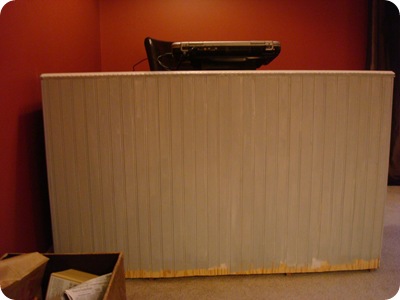
It started two and a half years ago when I took our builder basic kitchen island:

And added some molding and paint:

The sides of the island were made from that crapastic laminate stuff that you need to paint with primer. Which I did not. :)
So last May I removed all the molding and replaced it with beadboard and new chunky baseboards:

The little secret that wasn’t such a secret cause I showed you was that I never painted the cabinet side of the island:

I was soooo sceered! I don’t know why, I just didn’t want to touch them! I love our pretty cabinets, and it gave me hives to think of painting this side.
So they stayed like that. For another year and four months. :) More on that in a bit.
When I started my kitchen redo with the help of American Express and their lovely points (whoohoo!) I mentioned I was considering either painting the island a light cream color or a pretty apple green to go with the new lighter tones of the room. I primed the island to see how I liked the lighter, cream idea and it didn’t look right. So I decided to go with the apple green -- it sounded like such a fun idea!!
(Enter foreboding music here.)
I painted that island apple green, and it was a total and complete disaster. It was one of those where you say you just need time to “get used to it” when you really just need time to stop hyperventilating at all the time you just flushed down the toilet. ;)
It was SO bright! OH. my. goodness., it was screaming apple green. The way the light hit it made it completely obnoxious. So I mixed some black into the green to darken it a bit, and painted…again.
It was better! It was growing on me! And then the evening light hit…and it was a disaster all over again. I played the whole, I’ll get use to it (pleeease?) game some more and realized by about 8 p.m. that it wasn’t going to fly. And I looked at the cabinet side of our island and realized something really important – there was NO way on God’s (apple) green earth that I was going to be able to paint our lovely cabinets that color.
I wish I could express to you how wrong the green island looked in our kitchen. (I took pictures with my phone but I’ve since updated to a new one and they didn’t transfer!) If we lived in a beach house – adorable. In a funky, colorful house, perfect. In our traditional house full of warm colors – just wrong. ;) I’m sure it was the tone of that color I picked out that made it look so goofy, but I wasn’t going to try any more. I was done.
So…guess what? I painted. Again. Oh yeah, and again – two coats back to black. It was not a good day around here. ;)
I wanted to (finally) get this island project wrapped up, so last week I got my booty moving on the butcher block top I bought months ago at Ikea. It had been leaning in the garage, unopened, for all that time. (I told you I was highly unmotivated this summer!)
I did some checking around and found a woodworking company that would be able to cut it down to the right size for me. I had a chance to look around their shop a bit, and when I saw the beautiful routered edges they could add to it, my mind started racing. :)
The owner said they could cut it down and router the edge I picked out for $100 – YES PLEASE! I was SO excited when I picked it up last week because this (Numerar Ikea counter for $195):
Was turned into this:

Be still my thrifty little heart.
I was so excited, I installed it that day. I just unscrewed the screws underneath the previous countertop and pulled it off:

When the new top was laid on top, I just screwed them back in, with a couple extra for good measure.
My original plan was to sand down the block and stain it a very deep stain, then poly over the top of it. YUM. But when I saw it in our kitchen, I realized the potential for a really warm, natural looking butcher block instead.
Ikea treats their wood, but you need to do more when you get them installed. I started by sanding it down very lightly, then I did three coats of boiled linseed oil:

You just wipe it on with a white cloth and watch the magic happen. ;) We are not going to use the butcher block as a cutting surface, but linseed oil is perfect if you are planning to do so. It is food safe once it dries.
Because I didn’t want to freak out every time someone put a glass on the island, I also protected it with two coats of tung oil:

From what my Dad told me, the Chinese have used tung oil for about 600 years (give or take a few) on their boat hulls – and if it works for them, it works for me. :)
It gave it an absolutely gorgeous amber finish:

It is just beautiful. And no worries about the everyday stuff that happens in a kitchen!:

If there’s ever any damage to the top, it will be easy to sand it down lightly and reapply the oil. I will probably do a few more coats of the tung oil for an extra strong finish.
To finish off the beadboard, I installed some very thin molding around the top:

The top edges of the beadboad weren’t uneven, but it always looked a little unfinished to me.
I found a fabric I lurve at Calico Corners for the chairs:


I upholstered right over the old fabric that I showed you here. I love the slightly contemporary look of the fabric combined with the more traditional island.
And I was (almost) done! THEN, I finally painted the cabinets on the other side of the island. And all was right with the world. Two years and four months later. Good grief.
I present to you our completed, never touching it ever again for as long as I live, island:

I did a photo shoot with it from all angles, Austin Powers style…yeah, baby…YEAH!:


I want to curl up and take a nap on it, I love it so very much. Really. Night night:

Because I’m a sucker for before and after shots, here’s the before, a couple of years ago:
And today:

The I’m shaking in my boots to paint the cabinets before:

And the why didn’t I do this two years ago after:
Total breakdown for the transformation was as follows (over the past two years):
- About $50 for the beadboard, I think? Another $20 or so for the baseboards and skinny trim around the top.
- $10 for black paint. Lasted all eleventy billion times I painted it.
- $18 for two corbels from Home Depot.
- Chairs were from Garden Ridge, buy one get one half off – about $100.
- Less than $10 in fabric to cover the chairs.
- $195 for butcher block (I had to get a larger size) from Ikea – looks like it’s even less now!
- $100 to have the block cut and routered.
- About $20 for oils, foam brushes, etc. (I had some, had to buy some.)
Oh yeah, did I mention I got a quote of $1,300 for a very similar butcher block countertop from the company Home Depot uses? I saved one thousand buckaroos and it looks pretty darn good! I am SO happy with it, and it was so (grumble) worth (grumble) all the work!
P.S. I’ll show you how I painted the cabinets soon – and what I did that you should NOT. :)

Hello there! First of all, I must announce the winner of the Wuslu.com giveaway!!(Finally, I know!) Congrats to Reeban at Rejuvenating Trisha Lou! (She went on the Goodwill Shop and Hop with us – how cool!!) Please email Yasmin at yaso_n (at) yahoo (dot) com.
I hope you all had a wonderful weekend! I got a project completed with a little bit of help. Actually…a TON of help. But it was worth it. :)
You may remember my travesty of a desk I showed you a couple of weeks ago. It was a hot mess of mixed colors, woods, textures…just a smokin’ hot mess:
I didn’t even finish it, I just knew it was on the road to nowhere. ;)
Then I found a farmhouse table through a friend of a friend and it was everything I was looking for and more…in a table. Vintage looking, the perfect size, beautiful curves, and it had me at $15:
But it was mess as well. WHY can I not find something I don’t have touch? Oh yeah, I love this. ;) Drats.
So I geared up at my local True Value and one day started out by chipping away the little bits of brown paint with a scraper:

I figured I would give it a once over with my sander to see how much I could get off. Thankfully, I had picked up a lead test at True Value as well, just for this project. I showed you last year how to do a lead test, and whooee, I am SO glad I tested this before I moved forward with any sanding:

Not good.
By the way, pink means lead. RED means LOTS of lead. :)

Fantastic!! (Do you sense the dripping sarcasm yet?)
I highly recommend doing this test any time you’re going to sand anything you even suspect to be vintage or antique. The lead on this table was not in the brown paint, (that was more recent) – it was in a layer I couldn’t even see!
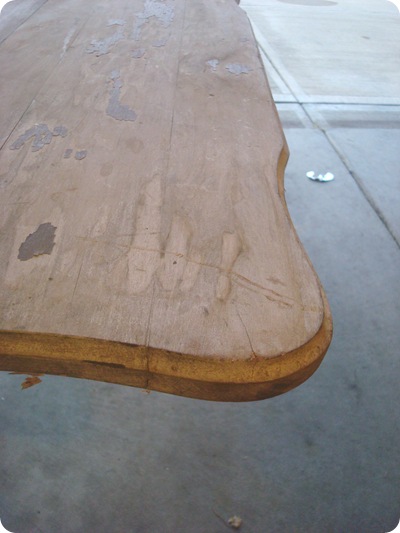
I was so bummed out. My easy project had turned into a total science fair. :) It took about five minutes of staring at the table before I realized I wasn’t going to tackle this one on my own. There are two things that freak me out when it comes to older pieces. One is lead, the other is mold:

And this one had both. :) Double AWESOME!! YES.
So I searched online and found a nearby refinisher who I talked to at length, and then decided to just bite the bullet and take it in. Because I was only having them take it down to bare wood, it was less than half the cost of a total refinishing job.
And the peace of mind (with a three-year-old in our house) was SO worth it. They had to take the whole thing apart to work on it, which was fine because I needed to change the direction of the legs anyway:

(Since my plan was to use it as a desk, I need the legs to go long ways with the table.)
When I first saw the table, I wanted to just poly over it and keep the lovely patina. But when the wood was really cleaned off, it wasn’t in the best shape. My only option was to paint it, so I laid everything out in my workshop on the driveway, and spray primed it all:

Because I’m using some blue in the fabrics and paint colors, I decided on a slightly lighter tone of the blue paint I picked out for the room – it’s a True Value color called Soft Hearted and I got it in mixed in Dutch Boy paints.
It’s a lovely light blue, almost grey color:

(It’s hard to see the blue in these pics.) I had never used Dutch Boy before and I loved it! Just the container is enough to make me a fan for life.
Because the table originally had leaves that dropped down, the previous owners reinforced the table and the leaves by using a thick piece of plywood:

Because you could see the edge when it was all put back together, I trimmed it out with with some scrap trim I had in the garage:

I didn’t have enough, so I still have more to do. :)
My plan all along was to take the whole tabletop apart and put it back together, because the wood had separated a bit:

But I kind of fell in love with it as is. When I painted it, I took a toothpick to each gap just to make sure it stayed goop-free. :) I think it shows the character and age of the piece, and I adore it!
I’ve mentioned about a bajillion times how much distressing stresses me OUT! This table was calling out for it though, so I did quite a bit on the legs and along the pretty edges:


And now it’s finally done!:

I know it’s hard to imagine it as I see it in the final room, but it’s gonna be GORG. The walls around the desk will be white (for the most part), and the art will be just beautiful. If you could see inside my head, you’d so be oohing and ahhing right now. ;)
The previous desk was HEAVY, so I have to work on getting those ruts out of the carpet. (I let ice melt on mine and it always works great!)
Now I need a cover for my parson’s chair – anyone out there know how to make one? Helloooo? Anyone? (Remember peeps, I use hemming tape…I’m not a sewer! Much of one anyway.)
You Squeezies know how much I detest cords…so I took another trip to Target for one of those fantastic, honkin’ baskets (I returned something from another room just so I could OK it in my head. ;) )
I put the shredder and the computer cords in the basket, and I can easily plug them in when needed. The basket lets everything breathe (even though they won’t be plugged in while in there anyway):

I love, love, LOVE all the space I have!! I can use the computer, craft, whatever. The table is surprisingly even on top, but I may get a piece of glass cut, or cut down some wood and paint it to make a smooth spot for writing.
I still need to get some clear, water-based poly to coat it a couple of times, but otherwise, I’m DONE. It was way worth it to pay for the help. ;)
When I asked the owner of the refinishing shop his guess at the age of the piece, he said it was made in the 1920’s, at the latest. That made me very happy. I love old pieces, and I love bringing them back to life:

*I was one of the bloggers selected by True Value to work on the DIY Squad. I have been compensated for my time commitment to the program as well as my writing about my experience. I have also been compensated for the materials needed for my DIY project. However, my opinions are entirely my own and I have not been paid to publish positive comments.*