
Materials: Expedit 5-by-5 bookcase
Fred is probably the P. Diddy equivalent of Hamsterville, with a 5x5 Expedit megahome all to himself. Katja, Fred's dotting owner, removed dividers on two "floors" to create large spaces to stretch Fred's short little legs. She also decorated the space with hamster luxuries like wooden ladders, bubbly cork goodness for Fred to dive in and play.
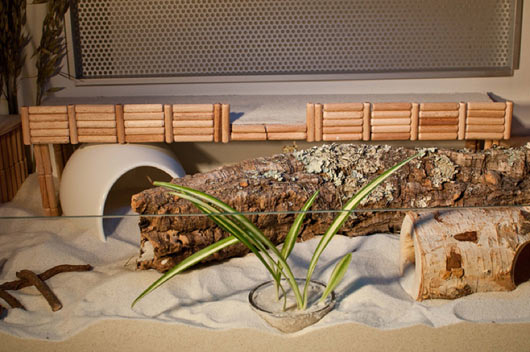

See more of the Expedit Hamster mansion. [via Pawesome.net]
~ Sonia Zjawinski

Materials: BESTA shelving unit + BESTA glossy swinging door, basic litter bin, dishwasher mat, PetSafe Big Cat Door
Description: This our a take on Jon's "Flaren stealth cat litter box" also listed on the site. His version's great, but since our space is a bit smaller and we have an ultra fluffy cat we needed an alternate solution since the enclosure-within-an enclosure concept didn't pan out too well (poo on fur = not a good thing!)
Step 1: Bore a hole into whichever side of the shelving unit you'd like. This is all a matter of preference. For us the left side of the unit was best.
Step 2: Install a pet door that suits your cat's size. We used the PetSafe Big Cat Door since our cat's quite large and fluffy.


Step 3: Place bin inside. Deodorizer (baking soda and homemade activated charcoal bag) additions are optional, but seems to reduce litter bin odour significantly.
And that's it! The unit does a great job hiding the litter bin and giving Taro some privacy while he does his business, and even though the litter bin odour isn't completely eliminated the set up reduces the smell quite significantly. Happy Hacking!
~ Jeremy Y., Mississauga ON Canada

Materials: Stolmen post and hooks
Description: Scratch post from stolmen post, small trees, carpet, a large plastic barrel and some other scraps. (Also featuring kitchen worktop, shelf brackets, copper water pipe and some old textile and a huge amount of sisal rope and glue.)
See more the Stolmen Scratch post. (Google translation here)
~ Selma, Norway

Materials: Gulliver
Description: A stool for my dog King made of the Gulliver chair. A very simple switch and the stool becomes a dog.


~ Jo Klaps, Brussels

Materials: Bonde
Description: In my Bonde-furniture now lives our little Hamster "Hämpfelina". I took out the shelves and everything else. Then I fixed windows of plexi-glass and installed everything for a playful hamster-life! We have now a lot of fun to see the hamster run around!


~ Carola, Switzerland


Materials: Ikea Hol Storage Bench
Description: First things first, I must give full credit to the original version of this in 2008, but who completed the answer for my dog crate situation in 2011.
My partner were awaiting our new arrival (a Cavalier King Charles Spaniel puppy), and we knew from the very beginning that we wanted to crate train him. But, as we live in a one bedroom flat, we didn't want to buy one of the huge metal crates that would look hideous in the corner of our relatively small living room. We thought about all sorts of options, and ended up googling 'innovative dog crate' into google and eventually found this fab idea on Ikea hackers.
We bought an Ikea Hol storage unit and when assembling it, we left off the lid and one end. We bought three small bolt locks from our local DIY shop and a piece of timber to reinforce the base. We screwed the locks onto what would become the front of our crate (two at the bottom and one at the top), and nailed the timber width-ways across the bottom of the unit.
Unlike the original hack, we decided not to nail the lid of the unit down so that it didn't come off, as by keeping it flexible we had not only a lockable crate, but also a puppy pen.


To avoid the base of the unit becoming soiled/wet/wasting away/chewed, we stapled some spare carpet down, remembering to leave about 1 inch spare by the front of the crate so that the door can lock properly. We then covered this in a cut up plastic bag, which we stapled down on top of the carpet. This stopped the carpet becoming messy and acts as a waterproof layer in case the pup should tip up his water bowl/pee. We chose a strong plastic bag that was thin enough to be able to go over the edges of the base, and underneath so that any other fluid would flow out and not stand a chance of ruining the base. Finally, we lined it with newspaper for house training.
We are ecstatic with the results, and everyone who has seen the result cannot believe this is a dog crate. It fits in perfectly with the rest of our room, and as a result we bought the other smaller Ikea Hol storage unit to go with it.
This now acts as a coffee table/electricity hub which protects the pup from any cables/wires that were previously out on the floor. This was really easy to do by just cutting out a small section of the base before nailing it down when assembling it. It now houses an extension cable with a hairdryer, internet box, laptop charger and many more! We wanted a small lamp on top, and to stop the light from shining down into the box and revealing all the messy cables within, we stapled a square of canvas to the inside lid, which also stops any pens/post it notes from falling through the holes into the box.
Overall, it cost us:
£45 for the large Ikea Hol box
£18.50 for the small Ikea Hol box
£3 for the 3 hinges
£2 for the spare timber
A brilliant solution to our problem, and our pup likes it too - thank you Ikea Hackers!
~ Ruth, Cardiff, Wales

Materials: Ikea Expedit Bookshelf, carpet scraps, sisal rope, cat beds, toys, velcro, staples
Description: A while back, I saw a photo of an old bookshelf converted into sleeping compartments for cats at a cat rescue. It was old and dirty, but I thought it was brilliant. Sooo- I had the idea to buy a 4x2 Ikea Expedit bookshelf to convert into an entire Cat Activity Center


The carpet and sisal are attached with staples. I had two extra spaces when I was done, so I added some regular rope for them to play with and some self-grooming brushes. As you can see, the center is a hit with my cats (I volunteer as a foster for a cat rescue).

The best part, I got the Expedit second-hand from a neighbor, so the whole thing was MUCH cheaper than those cat trees you buy at the pet store.
~ Susanne Campbell-Vincent, La Habra, CA, USA

Materials: Ikea Frakta bag
Description: With an IKEA Bag I made a rain coat for my dog!
~ Francesca, Rome, Italy

Materials: Oddvar Stool
Description: I took the legs of an Oddvar Stool, and two boards cut to fit inside, covered with a cushy fabric, and secured the boards to the stool legs. American Girl Dolls
~ Ingrid S., Ohio

Materials: Klubbo coffee table and UNG Drill frame
Description:
1. Painted the UNG Drill frame white. Dry it
2. Pick a picture online and printed it off.


3. Cut out the picture to fit in the frame.
4. Take the table top and put pillow filler on the table top and cover it with your favorite fabric. Staple the fabric on the other side of the table top.

5. Place the table top property and screw it on the leg.
6. Make little pillows to go with it to make it look like a bed.
Completed!!
~ Micci Do, SLC, UT

Materials: Pax wardrobe and doors, tons of screws, plexiglass
Description: As I have always been into little furry things, I wanted to give something back to my syrians. We decided, absolutely unselfish, to recreate the bedroom, so the wardrobe could be turned into a "cage".
In Germany, you often stumble across modified pax-wardrobes for hamsters, rats, cats, ferrets and lord knows what else, so I just couldn't help doing it... Or my father.
My father took the Pax and laid it down, cut out the inner parts of the doors an replaced it with plexiglass so we could watch the little rodents. He also added some kind of chicken wire on the short sides of the lower part as this was the only way to get some ventilation in there.
The floor for the upper part is made from one of the side parts, so we didn't have to buy a new board and left this part open for better ventilations.
Finally, the whole thing was called "Paxadies" and two hamsters moved into their new 200x55x50cm (~6.5x1.8x1.6 ft)home.
(And yes, my entire flat is furnished with Ikea-things. The hamster-home is placed on 3 little Lack-tables, which are now hidden behind some anno stra curtains, lit by orgel vreten and so on... :) )
~ Vyerny, Germany

Materials:Expedit Bookcase, LACK Wall shelf, Shelves Carriers, Material from an old scratching post
Description: I took an Expedit bookcase and a LACK wall shelf to create a storage cabinet which also functions as a cat playground.


~ Siebrenna

Materials: Billy bookcase, some shelves, hinges, ...
Description: The cage of our rats became too small and we had problems with the old cage because of litter falling all the time. So I reused a Billy bookcase (because I bought a new bookcase) and I separate it into three parts: one part storage, one part for our young rats and a part for our adult rats.


I bought some shelves and put an edge of 5 cm attached with dowels to prevent the litter from falling. Finally I painted everything.

For the doors, I assembled boards with dowels and wood glue and I put the grate recovered from the old cage.
~ Laura V, Liège (Belgium)

Materials: Gorm Shelving, wood trim, hook latches, hinges, staples, furniture tacks, steel mesh, galvanized wire
Description: After adopting our new English Lop, my husband decided to take on making a cage that would be functional with our space and give her as much room as possible.
We used The Gorm shelving system:
2 longer shelves (Width: 30 3/8 "Depth: 20 1/8 ")
3 shorter shelves (Width: 19 5/8 "Depth: 20 1/8 ")
3 corner shelves (Width: 29 7/8 "
Depth: 20 1/8 ")
9 Posts (Height: 43 1/4 ")
We assembled the shelving, and then attached steel mesh to wood frames using industrial staples and furniture tacks. He then drilled these frames into the Gorm in sections. We made door frames and attached the galvanized wire via staples. We attached the doors with hinges and latches. They open and close with latches.
We added a long ramp so she could run up and down to the second and third level.


Finally we laid down rubber on the bottom and covered all shelves with carpet.
The best thing is we can continue to expand it as she grows in both length and height!
Total cost about $150.00
~ Elsa, New Jersey

Materials: Borrby
Description: We adopted a praying mantis female from the garden (before the frost) and were looking for vases to make into terrariums. We stumbled across the large Borrby lanterns - scoree! A perfect size, beautiful, and a much better access than a vase (door on the side).
A few modifications were needed, starting with removing the nail sticking up in the middle (I thought it would snip off but it required some dremel work).

Next was the "windows" which were are probably small enough to keep the mantis in, but certainly too big to contain her food (crickets) - so I glue-gunned mosquito screen from an old window on the side vents. I left the top level of vents open, and instead put a piece of screen across the entire access to the "attic" section.


A piece of cedar shim glued to the back wall gives a nice rough surface to climb on.
The tabs and slots construction left some large openings around the bottom walls, so they got a bead of caulking.
A piece of a plank became a base for plants and sticks, and a dollar store pot holder turned into a nice woven carpet.
Linda (the beast) seems lo like her new abode - she loves to hang out on the screen ceiling, and if we open the door she climbs out all over her house.

~ David d'Anjou, Montreal