
Materials: Lack Bookcase, Capita Legs, Iris Chair Pad, Signe Rug
Description: We initially made this bench to go with our dining room table, but after a few IKEAhackers' readers were worried about the weight restrictions, and we had relatives complain about having to sit on a bench for Thanksgiving dinner, we found ourselves some lovely dining chairs and found a new use for the bench. Weight restriction still applies, though these days its mostly a toddler who is enjoying the view!
How to:
Turn bookcase on its side
Attach 6-8 Capita legs (they come in 3 heights)
Attach 5 Iris Chair pads (they fit almost perfectly)
Braid ends of fringe of 2 Signe Rugs
Attach rugs with a staple gun
Add decorative pillows


The baskets are old IKEA, that I actually found at a salvage store. I spray painted them white and made tags so our little one knows what goes where.
See more of the window bench.
~ Alex T, San Francisco Bay Area


Materials: MOSJO TV Stand, piece of wood cut to fit the top of the stand, spray adhesive, batting, carpenter glue and canvas material from IKEA.
Description:
I started with a MOSJO TV stand from IKEA. We are renovating our bedroom and no longer needed these for nightstands. I used a piece of wood cut to fit the top of the stand, spray adhesive, batting, carpenter glue and canvas material from IKEA.
I cut the batting to size and used the adhesive to stick the sheets together. I used 4 sheets but you can continue to layer them until you reach the softness you desire. I then cut the material adding an inch all the way around the bench pad.


Place the batting face down on the back of the material, place the wood on the top of the batting and pull the sides up tight. Use the staple gun to attach the fabric to the back of the bench pad.
Then I used wood glue to secure the pad to the bench and my husband placed 4 screws (one in each corner) for me to ensure that the pad and the stand wouldn't separate. I finished the look by adding two small baskets on the bottom shelf to keep hats, mitts and outdoor accessories in. Easy!!!

See more of the waiting bench.
~ Chelsey Davis, Guelph, ON

Materials: Gorm, Behandla
Description: My wife and I always wanted a window sill that doubles as a bench. The only problem is that the required wood was to expensive. Then I thought of Gorm, the cheapest shelving unit from Ikea.
I used 8 Gorm 50 cm shelves and 8 height extension posts. First I painted them white using Behandla. I sawed them to a breadth of 35 cm. And used the sides to connect the boards to the window frame.
The extension posts are used as legs.

~ Christiaan, Holland
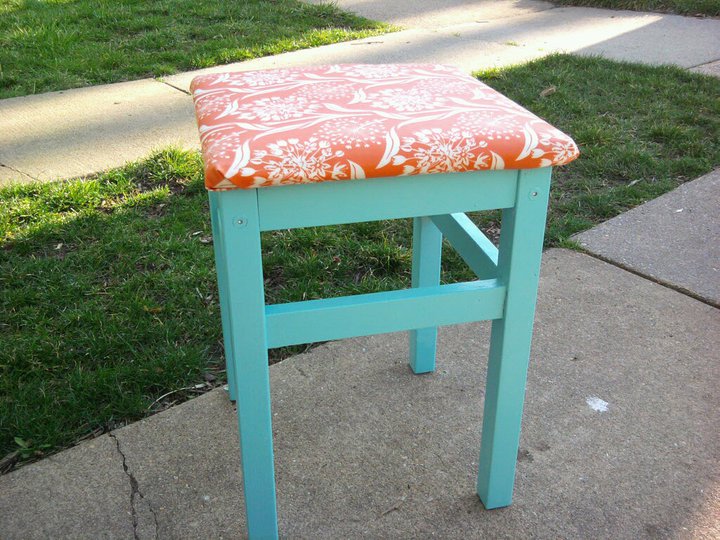
Materials: Stool
Description: This was a boring blue stool that I bought at IKEA around 2000 (sorry don't remember the name). It didn't match anything in my current house, so I painted it a bright turquoise to match my dining room chairs. I took the seat off, attached some foam, and then upholstered with a bright orange and white laminate fabric. The entire project took about 2 hours, and voila! I have a crisp new stool to welcome spring!
~ katharine briscoe, Alexandria, VA

Materials: Bekvam stool paint, black card and clear varnish
Description: I painted this stepin cream and punched out 1" circles out of black card and stuck them on and varnished it 2 years on and they still look good in my kitchen
~ S Franklin, Northern Ireland (Northern Ireland)

Materials: Pallbo footstools, Fredrika fabric
Description: Lisa and I had a couple of Pallbo footstools laying around the house. Pallbo is nice, but is a big waste of space. Surfing the Web I came across this page. I had some scrap wood in the basement, so I decided to merge the two to obtain a bigger upholstered chest to store some blankets.
Bill of materials:
------------
2 Solsta Pallbo footstools
4 small wood boards to join the panels
some plywood for the lid
Fredrika fabric
velcro tape
3 hinges


First I disassembled the footstools. Then I joined the two front panels side-by-side using two small boards. I did the same with the two backs. Then I cut the feet and I re-assembled the box, using the old lids to make the bottom of the box. Then I cut a piece of plywood to make the new lid. Then I fastened the hinges and glued the foam on top of the lid.
Now for the hardest part: upholstery. I took my mother's more than 40 years old sewing machine and I sewed a new lining for the box using a couple of meters of Fredrika fabric. Beware to prewash the fabric before to do anything, as it will shrink about 4%. All the new lining is hold in place with Velcro tape, making the box easily unlineable.
Then, with the left fabric, I made a coordinated pillow.
Now, after about five days, we have a new storage box, and all the blankets are not messing around anymore!
Less confusion => happier wife => better life!
~ Alberto, Tavagnacco, UD, Italy

Materials: Marius, cotton yarn, foam rubber
Description: I have crocheted a free form motif with birds. The pattern to the birds can be downloaded free at the knit and crochet site ravelry.com.


I first crocheted two long tubes to cover the legs of the chair. Then I made the birds and crochet and sewed them together to a big circle, and at last I crochet around the piece to make it big enough to fit the plate. I added a piece of foam rubber to make the chair a little bit more soft to sit on, and then I wrapped it with the crocheted cover.

~ Kristin, Sweden

Materials: An old Ikea stool, fabric, fiber foam, spray glue and staples
Description: Very easy, I just glued some foam on an old stool then stapled a nice fabric on it and "voila"!


~ Marlene Weil, Montreal

Materials: NUMERAR + plywood + paint (red, blue, black, yellow)
Description: Rietveld designed this red-blue chair in 1923, inspired by Mondrian.

1. I had some spare NUMERAR countertop (28mm thick)
2. The chair is made from 28mmx28mm sticks that you prepare, following instructions downloadable here.
3. Paint them in black (see picture above)
4. Buy 2 plywood rectangles, paint large one in red, small one in blue
5. Assemble and finish painting
~ laurent thenie, FR

Materials: RIT dye, salt, washing machine, Klippan sofa slipcover
Description: When I moved into my Lower Greenville apartment in Dallas, I had a limited budget to outfit an entire apartment. So, of course, I went to every budget-lover's dream store, IKEA! They didn't have the couches I originally picked out in stock (thank goodness, because they would have been horrible once I got a dog and boyfriend!), so I chose to invest in the Klippan Sofa. It retails for $229, and has a great shape and size for what I was looking for.
Yet I thought it lacked a little pizazz when it came to slipcovers. You can choose from black, white, natural, primary blue, creepy-quilted, crazy pixel birds, or denim. None of which matched the urban-chic I was going for.
So what's a gal to do? She goes to the drugstore and buys a few bottles of RIT dye
 ! The process is amazingly simple. Soak your slipcover in the bathtub, start your washer and follow the directions on the bottle. I used a mixture of purple and fuchsia
 to come up with this eggplant color. It was absolute perfection. I adored my purple couches, and if you take a look at the RIT website, the options really are endless! They have a gorgeous honeysuckle rose, the perfect shade of aqua, and so much more.
 When it was time to move out of my apartment and into a home with my husband, I gifted both couches to a friend of mine. Her decor didn't include purple, however, so she bought two natural slipcovers and did a little dyeing of her own. These are actually crimson in person, not orange.

As you can see, I didn't have my camera settings quite figured out six months ago! These slipcovers are a lot cheaper than their leather counterparts, and can be a ton more fun. I tried to talk her into the aqua, but she opted for red. If I ever invest in another IKEA slip-covered piece, you can bet your biscuits I'll be dying it something bright and fun!
See more of the dyed Klippan slipcovers.
~ Brooke, Lake Jackson, Texas

Materials: Sater 2.5 seat sofa (leather), assorted hand tools
Description: My roommate and I bought an IKEA Sater 2.5 seat sofa, and after about 6 months of normal use (never more than 2 people sitting on it, it snapped in half, folding like a hinge, with the frame resting on the floor. We lost the receipt, so we couldn't get a new one from IKEA :(
We put it up on cinder blocks for a few months, but when we moved apartments, I couldn't bear to throw it away, so I decided to chop it in half, reconnect one of the arms to the cut-end, and create an awesome chair.
Click to read more>>

Materials: Poang, fabric, walnut finish
Description:
I had an IKEA Poang chair that I hated. Normally the Poang doesn't bother me, but this one originally had a red glossy wood finish with a dark green seat. yuck! I wish I had taken photos of it before changing it because it was absolutely hideous and I can't find this combination in google images. I sanded the entire thing, gave it a walnut finish and changed the entire mid section so that the fabric supports your weight. The cost of redoing the chair was surprisingly low since I used wood from the chair. I just bought the thick fabric and screws that hold it on, which only cost about 15 dollars. The orange scented wax I used cost more than that!

~ Matt

Materials: Snille chair ( I used white )
Description:
1. Cut out eyes with black felt. Use Velcro

 strips to put it on the chair.

 (pic, right) mouth.
 3. Put the pillow on the chair. There is a Domo-Kun chair!!
~ Micci Do, SLC, UT

Materials: Tullsta Chair
Description: There must be a million ideas that an art teacher can gather from the book, Where the Wild Things Are
 by Maurice Sendak. This was my go to book for inspiration when I was asked to decorate an Ikea Tullsta chair with my students. The kids and I had a blast working on this chair. The hardest part was knowing when to stop!
Lightly sketch jungle themed trees, vines and tall grasses onto the canvas chair. Ask the children to draw in animals or monsters hiding within the jungle. Color in the drawings using permanent markers and or fabric markers. Let the canvas color act as the sky, leave it uncolored. Admire your beautiful work and have a seat!
See more of the wild thing Tullsta.
~ Doris Huntington, NY

Materials: Lack coffee tables
Description: This is a bench made from the ubiquitous "Lack" coffee table. We had several kicking around and I found the rest for $4-6 a piece on Craigslist.


Each one is cut in two, filled with expanding insulation foam and covered with latex paint (for waterproofing).
The uniform locations where the legs screw in make perfect pilot holes for drilling out a section from each corner. Two steel rods (3/4 inch) slide right through the holes and support the whole thing.


The backrest (and rear slanted detail) is made of the tables' legs screwed right into one another.
See more of Charles' Lack bench lounger.
~ Charles Crawford, San Diego

Materials: 4 laminate bent Ikea legs and two seats from antique banker's chairs
Description: My friend Veronica gave me two Ikea chairs she had in her apartment in Hollywood. They were laminate bent leg living room chairs that had no arms. The cushions smelled like cat pee so I threw them out. I kept the frames five-ever because the bent wood seemed too good to throw away. I also had these oak banker's chairs with broken legs. Again I just couldn't throw them away because they seemed too good.
One day I got sick of all of them hanging around, taking up space and not paying rent! I tried to throw them away, but I ended up taking them apart and reassembling all four chairs into one chair. It was too much fun! We use it in my living room and it is kind of a hit because it is bouncy with the bend wood and the springs from the bankers chairs.

One of our guests told me about your blog. The only problem is I can't find the name of the Ikea chairs I got the legs from. I looked on the website but it is not the POANG chair. The ones I used didn't have arms. However, they both have that plastic wedges that stop the chair from rolling forward. I think that is a unique Ikea detail. Hopefully, you might recognize the chairs this was made from.
To make it I took both Ikea chairs and removed all of the cross members and bolts. Then I lined the bent legs up together. I noticed all of the holes for the through bolts lined up perfectly so I took some threaded rode and cut it to the combined width of all four legs plus enough room for a bolt cap on each side. I put some Loctite on the thread ends and bolted them together.

The bankers chair seats are held onto the chair with through bolts and threaded inserts I mounted into the bottom of the oak seats. I took the springs off the banker's chairs and mounted them to the Ikea legs by screwing 2 chunks of closet rod to them. The springs just rest over them and the seat of the chair just rests on the springs. The springs actually fit into a recess in the oak seats perfectly locking it in place. It was all just very lucky. I hope you enjoy it.
~ Andrew Riiska, Los Angeles