
Materials: Faktum/Abstrakt
~ philipp petersen

Materials: 1 "Expedit" Shelf, 1 "Rill" pack of 4 wheels, 4 brackets
Description: Having a 50 watt guitar amp at home can be quite messy when doing the weekly clean-up. I saw at friend's house an Expedit shelf used as base for a 2x12 guitar combo, so I thought it would be a great idea to have it with wheels so you can move it to your desire without effort (Tube guitar amps can be quite heavy) and in addition, keep my pedal case tidily.

Here's my hack :
- Assemble the outside square of the Expedit shelf
- Throw away the little separators and keep the big one
- Fix the squares to the desired height and put on the shelf you keep from the previous point
- Fix the four wheels with an electric screwdriver and ...
Voila!!

~ Joan Aparicio, Zaragoza - Spain

Materials: 2x APA, 1x HYLLIS, screws, scrap 1/4" MDF w/birch veneer
Description: The Ikea APA toy boxes are inexpensive and reasonably attractive (with their white laminate side-panels), but I have never found them to be particularly useful for storage as intended. Inspired by a project in the book "ReadyMade: How to Make [Almost] Everything: A Do-It-Yourself Primer
Click to read more>>

Materials: Hemnes 3-Drawer Chest, Hand Saw, Plasterboard Saw, Circular Miter Saw, Hammer, Power Screwdriver, Level, 2" Wood Screws, 3" Wood Screws, 3" Nails, Utility Knife, 2"x3" Framing Studs, Plasterboard Hand Sander, Shims, Hand Level, 1" Finishing Nails, Spackle, Painter's Tape
Click to read more>>

Materials: Billy (4x 80cm; 2x40 cm) including top pieces
Description: Here's another straightforward bunch of Built-in Billy bookcases.
The one Mikko did a while back inspired us after moving to a nice old big house to do something similar. Hopefully these pictures add something to the ones posted already.
All the Billy bookcases are second hand and of several generations. We even found one 90 cm wide Billy which we didn't use in the end because we couldn't find a top piece for it.
In the end two 40 cm cases and four 80 cm ones were incorporated in this build.


Two 10 cm thick beams of wood up from the floor, a wooden frame with plasterboard around and an aesthetically pleasing redone plinth on the floor and ceiling. It has that "It has always been there"-look.
The gaps between the separate bookcases were camouflaged with thin slats. The whole frame around the built ins was made from MDF.
A wall socket that was to disappear behind the new wall was extended and placed near the bottom of the wall.
In the first picture there's a shot of another hack we did: the small version of the Fado-lamp only has a 20 centimeter long tube between the ceiling cap and the lamp itself. Now it has a meter long aluminium tube so it can hang at better height above the dinner table.
~ Jasper, Grunn

Materials: SANDNES shoe cabinet
Description: Aylin tipped me on this Sandnes shoe cabinet transformation that is oh-so-chic. The hacker, Serim installed 3-D wall covers onto the cabinet doors and repainted them to match her walls. The exposed wood trim is painted a slightly lighter hue for a two-toned effect. Finish with cute knobs and there you have it. ~ Jules

See more of the shoe cabinet transformation.

Materials: Expedit, Besta
Description: We decided to move around the furniture in our living room, to get more space around the couch. We ended up with the Expedit and the two Besta bookshelves, which didn't really fit together, because of the different high and depth.
So we had the idea to put the Bestas on top of the Expedit. We only needed to remove the top of the shelves since it did not fit underneath the ceiling.
And we fixed the Bestas to the wall by using the attachments provided with the IKEA kitchen Faktum cabinets.

In between the two Bestas, I added extra shelves to put some decoration. And behind the green painting, we have the temperature control device for the heating system., which is now nicely covered, and can still be easily accessed.
Bye the way, those Bestas have a lot more shelves than the originally provided amount. They where bought in the hardware store. For us its the perfect book shelves, since they have the right depth for soft-covers.
~ Anna, Bremen, Germany

Materials: OMSORG
Description:
This rack is for those shoes you have to use every day.
You need the Omsorg shoe tree.
Remove the plastic end.
Take a square-shaped timber (40 x 40 mm), length 30 cm for one pair of shoes.
Drill holes with a diameter of 10 mm.
You have to insert a metal made wire with a diameter of 2 or 3 mm into the clip of Omsorg. That is for stabilization of the clip. The length of the wire is 15 cm. If you do not so, your shoes are too heavy and will bend down.
Insert the wire into the clip, glue it with hot melt adhesive and plug both into the drilled holes. Glue it with hot melt adhesive.

Hier noch mal in Deutsch:
Das Regal ist für Schuhe, die man jeden Tag benutzt.
Man benötigt die Omsorg Schuspanner, deren Enden abgeschraubt werden.
Zur Wandbefestigung wird ein Vierkantholz benötigt. Ca. 30 cm Länge für ein Paar Schuhe, der Abstand muss mit Hilfe der Schuhe ermittelt werden.
Die Bohrungen für die Feder beträgt 10 mm. Zur Stabilisierung der Feder (Omsorg) muss ein Metalldraht (2-3 mm Durchmesser) in die Feder eingeschoben werden. Die Länge des Metalldrahtes beträgt 15 cm. Wenn der Metalldraht nicht drin ist, wird die Feder durch das Schuhgewicht nach unten gebogen.
Der Metalldraht wird in die Feder gesteckt und die Feder in die Bohrungen. Alles mit Heißkleber verkleben.
Mit der Wand verschrauben und zum Schutz der Wand ein Plastikbrett verwenden.
~ Andreas Fürst, Steffi Welz, Dresden, Germany

Materials: Rast dresser, silver leaf, paint, crystal knobs
Description: Painted the Rast dresser with black paint, then applied silver leaf glue adhesive to fronts of drawers. Next was to lay silver leaf on the fronts. Seal the dresser with wipe-on poly and add some bling in the form of crystal knobs!


See more silver leaf rast dresser.
~ barbara@hodge:podge, Vancouver, Canada

Materials: Rast Dressers, paint, wood stain, wood filler, drawer handles, drill
Description:
-Two Ikea Rast dressers
-Wood measured to build two shelves
-Two 6"x1"x12' pieces of wood - the surface piece cut in half and stained
-Wood filler to fill in the drawer knob holes
-A quart of hi-gloss Martha Stewart paint in Seal (used two coats)
-Six new drawer handles from Home Depot (you will need to drill new holes for the handles)

~ Nadia Shen, Brooklyn

Materials: Grundtal Double Towel Rail
Description: I measured my fabric for my sling, adding a generous allowance on all sides for the casing and hems (1 inch in my case). I then hemmed the (short) sides of the rectangle (making sure the finished width matched the width of the rail) and then sewed the casings for the rails on the long sides. I then simply unscrewed the rails, slipped the sling on and...voila!

See more of the book sling.
~ leila@rook
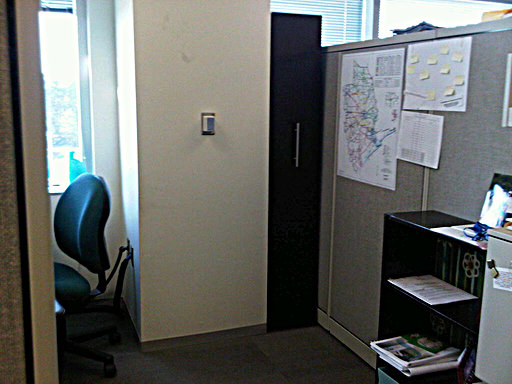

Materials: Trofast frame pine, Trofast storage boxes, wooden closet rod, 4) 4x4x1 wood blocks, 4) 2" rigid casters, Lansa handle, stainless coat hooks, coat hangers, misc screws, oil based paint, and an electric drill for pilot holes
Description: My daughter recently moved into a new office cube with a window. Having a window was definitely an upgrade but the building support beam, not so much. She lost valuable desk and drawer space to store all of her required work gear. The little cubby hole on the other side of the beam was too narrow and deep for any cabinet we could find. Searching my Ikea catalog, I came across the Trofast frame. If we turned it sideways it would just fit into that little spot.
I bought the Trofast frame in pine so it was not as heavy for her and easier to paint than the white one. I put it together per the instructions then added a piece of wooden closet rod at the top. I drilled a pilot hole through the frame and into the rod then screwed it in place with 2 1/2" screws.
At the bottom I attached a 4x4x1 inch block of wood flat in each corner under the frame with screws. The 2" casters were screwed on to the wooden blocks raising it just off the floor. In another situation, I would have preferred larger wheels but I wanted to keep it as low profile as possible.

I lightly sanded and painted the whole thing with dark brown oil based paint for a more durable finish. After it dried for a few days, I added a 7" Lansa handle to the outside front (in this case). The frame was not quite as deep as the cubby hole so I added two coat hooks to the outside back for a little extra storage. And I added a couple of Trofast storage boxes.


Now she has a rolling closet to store all of her jackets, boots and other gear. It works great. She pulls it out when she needs something, then pushes it back and it's out of the way. And she loves the view too!
~ Karen Snow, South Houston, Texas

Materials: Any expedit, spare expedit shelves (or just any other wooden shelves), saw, paint
Description: As I wanted a wine rack, but had no place left to put one, my eye turned to the Expedit I had in use as a room divider. Noticing how it might accommodate four bottles in a # design, I set out to make an Expedit style wine rack.
Really all you need is four shelves, a saw, and some patience. Spare Expedit shelves will do great, since they're already in a matching color and of the right
size*, but any shelves will do.


Saw two slots into each shelf at exactly 1/3 and 2/3 of the width (see schematic). Paint the shelves as required, then slide them together and insert into Expedit. That's all!
* actually, if you go with Expedit shelves, have a mind to take out the saw and make them square, instead of rectangular. I didn't realize at the time that the Expedit "squares" are not cubes - their depth is greater than height and width. Using square shelves will leave you with about 3 inches of extra storage space behind the bottles, and the shelves will still be longer than any wine bottle you'll put in.
~ Joost, The Netherlands

Materials: Ekby Gruvan shelf; Vika Curry legs; Godmorgon box; Kolja mirror; Gilbert stool
Description: My bedroom isn't very large so I needed a small makeup vanity. I'm the type that likes to see all my makeup because if I don't see it, I won't use it. The Ekby Gruvan works great for this reason.


Connect 4 Vika Curry legs to a Ekby Gruvan shelf (I used the 48 1/2 inch). If you need a larger surface area, the Ekby Gruvan table top would work too.
The Godmorgon box with compartments fits perfectly on top of the shelf for more storage.

To finish off the vanity, the Kolja mirror is hung on the wall and the Gilbert stool works great with the small area.
Acrylic trays from the local craft store fit perfectly between the shelf and glass to store all of my makeup.
This was such an easy project and took less than an hour. The part that took the longest was organizing the makeup!
~ Annie, Fairfield, CA

Materials: SKAR Cabinet with Mirror
Description: IKEA pictures this with keys, etc on hooks, but I installed in my bedroom and made it into a jewelry cabinet.
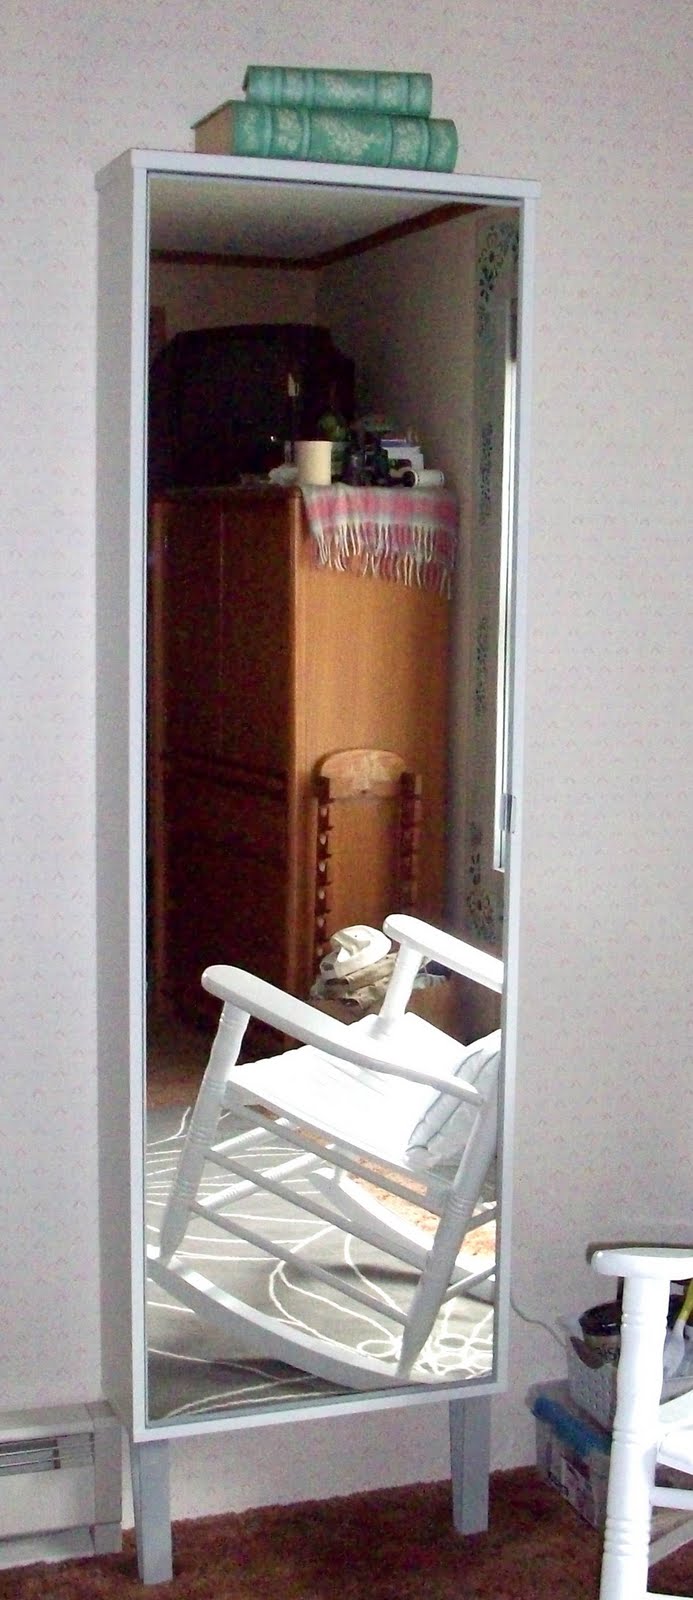
Install per IKEA instructions with 16 hooks provided. Add 12 3M hooks


I love it because it is well organized, easy to see all, but closed up in the cabinet not getting dusty.
~ Christine, Bucks County, PA

Materials: Atran medicine cabinet
Description: I used painter's tape to mask off the red cross symbol on the front door of the Atran lockable cabinet. Next I took 180 grit sand paper and gently scuffed up the remaining surface of the front door.

~ MyDesignerMuse

Materials: Pallbo footstools, Fredrika fabric
Description: Lisa and I had a couple of Pallbo footstools laying around the house. Pallbo is nice, but is a big waste of space. Surfing the Web I came across this page. I had some scrap wood in the basement, so I decided to merge the two to obtain a bigger upholstered chest to store some blankets.
Bill of materials:
------------
2 Solsta Pallbo footstools
4 small wood boards to join the panels
some plywood for the lid
Fredrika fabric
velcro tape
3 hinges


First I disassembled the footstools. Then I joined the two front panels side-by-side using two small boards. I did the same with the two backs. Then I cut the feet and I re-assembled the box, using the old lids to make the bottom of the box. Then I cut a piece of plywood to make the new lid. Then I fastened the hinges and glued the foam on top of the lid.
Now for the hardest part: upholstery. I took my mother's more than 40 years old sewing machine and I sewed a new lining for the box using a couple of meters of Fredrika fabric. Beware to prewash the fabric before to do anything, as it will shrink about 4%. All the new lining is hold in place with Velcro tape, making the box easily unlineable.
Then, with the left fabric, I made a coordinated pillow.
Now, after about five days, we have a new storage box, and all the blankets are not messing around anymore!
Less confusion => happier wife => better life!
~ Alberto, Tavagnacco, UD, Italy