
Materials: 2 cabinet doors from IKEA's scratch-and-dent section
Description: I found two great cabinet doors in the scratch-and-dent section at my local IKEA. They were begging me to take them home!
One of the doors had two glass panels, and the other had one glass panel and one wood panel.
I've been looking for some way to display my son's artwork, so I had an idea.
I painted the bottoms of both pieces with chalkboard paint. I wasn't so sure about painting over the glass, but it worked well.
I put some artwork behind the glass pieces, and then the chalboards at the bottom are for doodling and my son's daily "to do" list.
The cabinet doors look great in his room and they are useful!
~ Laura Stephens, United States


Materials: Nyttja-frame, wooden square bar, saw, glue, paint, cardboard, cutter knife
Description: A re-built Ikea Nyttja frame made a great drawing holder for our kitchen wall. The frame has the size for A4 papers, and fits most of the drawings produced by our kids.

I saw and glued a thin square bar onto the backside of 3 of the sides, left one short end open. I removed the back of the frame, and pulled out all the metal holders. I wanted to keep the acrylic front, and fixed it with contact adhesive. Painted the bars black to match the frame. To finish it I made a new back piece of black cardboard, and had made a hole for hanging before gluing it on to the back of the bars.

As the frame is up on the wall, the drawings can be pushed into it from the side where I left it open. And the drawings can be changed as often as they get produced!
See more of the Nyttja changeable artwork frame.
~ Lilla a

Materials: 3 dignitet curtain wire kits
Description: As a frantic hoarder of tickets, postcards and other bits of general stuff, I was looking for a practical, attractive way to display (and rotate) treaured mementos.

The Dignitet curtain wire system provided the perfect solution. Simple.
~ Shel, London

Materials: Ikea clock
Description: I had an old Ikea clock in my flat. I disassembled it and put the small mechanism into a card board box from the trash...
Besides, I glued ice cream sticks on the needles for the ecological style!!
See more of the cardboard clock.
~ Petitbill, France

Materials: Lindmon wooden blind, wood glue
Description: Put the blind into the shut position so that all of the slats are lying flat, and lay this on the floor. Decide the size you would like your notice board to be: I opted for the easy size which is a square the same dimensions as the width of the blind, meaning no cutting or sawing needed. Gently cut the string at the top of the blind to remove the metal and at the bottom to remove the thick bottom slat, being careful to keep the rest of the slats in place.

Next, remove one slat to use as a measuring stick to decide the number of slats needed, and then remove any extra slats by sliding them out the side of the string.
With the spare slats removed, create a frame and glue together using 'No More Nails' or similar, as shown in pic.

Next, use a couple of extra slats to position down the middle to add support to the frame. Unfortunately I don't have a picture: excitement must have got the better of me!
Once the glue is dry, simply glue over the top of the frame and position the slats on top, ensuring all the edges are flush. Leave the string at the top and bottom hanging and then tie up when the glue is dry. I tied the string into a loop and use it to hang the board onto the wall.
Enjoy placing your photographs, ticket stubs, invitations etc in between the slats or attach with drawing pins. The wood is nice and light so easy to get pins in and out of.
See more of the Lindmon noticeboard.
~ Helen, Bellanaleck, Co. Fermanagh
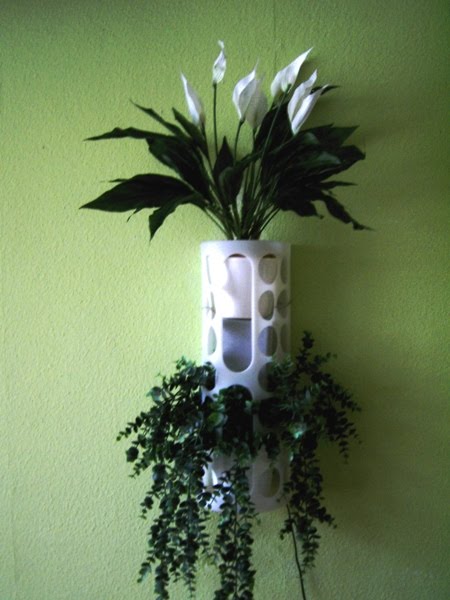
Materials: Rationell Variera, Kardemumma, wire, plants
Description: Why only use your Rationell Variera for plastic bags in the kitchen? I hang it on my wall in the living room. Now my cats can't reach the plants in it. I also put one of my speakers it.
For the upper plant I made a sort of a rack out of wire so it don't flatten the one below.
The pots for the plants I've used are the smallest Kardemumma, they exactly fits.
~ Marinka

Materials: 18" Hultet dish, Discontinued Ikea clock, drill, wire, dowels
Description: I needed a nice clock for my bamboo-themed bathroom, but nothing seemed quite grand enough. My boyfriend happened to have an old round wall clock he had purchased from Ikea a few years ago (I forget the name of it now, it has since been discontinued). As fate would have it, I had also recently purchased a few bamboo Hultet dishes to hang in the bathroom as decoration. I got the idea to frame the too-small clock with one of the 18" dishes...but how to do this while still being able to access the battery on the back of the clock?
1. Figure out where to drill your holes based on where the hanger is on the back of the clock and where it aligns with your dish.

2. Flip the dish over and drill two holes from the back. The two holes should be an inch or two higher than the location of the clock hanger.

3. Using a malleable wire (like frame-hanging wire)string it through the clock hanger. Thread the two ends of the wire through the two holes you just drilled.

4. Using a small dowel or stick (I just used a leftover Ikea dowel), tie the wire to the dowel and used it to tighten the wire until the clock hangs in the center of the dish.
5. Once you have the clock in place, figure out where the top of the clock is and lean the dish upright against a sturdy surface, oriented with the clock upright.
6. Slowly and carefully drill another small hole in the "lip" of the back of the dish.
7. Thread a loop of wire through this hole. This is for hanging it on a nail in the wall. Secure the wire with another dowel or stick.

To replace the battery, simply unwind the wire holding the clock to access the back.
~ Stephanie S, Berkeley, CA

Materials: 3 LACK side tables, at least 3 yards of fabric
Description: My roommate and I were perusing IKEA and saw a nice wall art display at IKEA. The store display used actual frames of some kind. Problem was, IKEA didn't sell those types of frames in their store (I don't even know why they displayed those frames in the first place). They did have fabric though, so we picked out a pattern that we liked.
On the way out we saw the LACK side tables on clearance for $5 each, so we decided that it would probably be less expensive to just wrap fabric around the tables rather than trying to find actual frames at a craft store.
We used a staple gun, clamps, at least 50 staples, at least 6 small nails, and at least 3 yards of a medium density wire.
To staple the cloth to the back of the table we stretched the cloth and clamped it on opposing sides. Using the staple gun we spaced the staples in the back about an inch apart. We repeated the process for the other opposing sides. Don't forget to cut off any excess fabric. To not have lumpy corners of fabric, cut the fabric at a 45 degree angle on the corner you're working with. Then pound in two nails two-thirds up the way on the back. Wrap some wire between the two nails and make sure the middle of the wire can extend to the top (or about the top 1/3) of the frame, to ensure it will hang properly.
And voila, art for the wall.
~ Dave T., Santa Monica, CA

Materials: Nyttja wooden frame
 Description: Before, to note to buy or to do list, I used a piece of durable plastic (right). It wasn't pretty to look at.
 So I was looking for another and cheap way to write my list on. I had two Ikea wooden frames, the inset at the back was damaged, I couldn't use it as a frame anymore.
I painted the frames in gray and pasted the durable plastic on the frame. Then I hung them up simply and I really like them more than before.
~ Laura V., Liège

Materials: IKEA Tyst placemats
Description: I wanted a very large cork bulletin board for my new workstation, but they are so ugly! Plus a large one is expensive. I bought these Tyst cork placemats which proved to be much cheaper ($10 for two 4-packs). And much cuter!
1. Paint the backside of the cork - I mixed colors to match a rug in the room. If you paint it first, you'll get a nice, clean, unpainted edge after the shapes are cut.
2. Use a computer to draw a shape, print it out, and used it as a pattern. Draw the pattern on the front side. BEWARE: the Tyst product description says it's 13x17 inches, but it's really 12.5x16.5! So be sure your shape will fit on the placemat.

3. Cut the shapes using an Xacto knife
 . Don't use scissors - they can leave the cork with a jagged edge.
 4. Attach to the wall with adhesive tabs. Tip: If the tab won't stick to the cork, a piece of tape on the back of the cork will give a nice smooth spot for the tab to stick to.
~ LuluRoo, Sacramento, CA

Materials: SNÖVITA gift wrap rolls, aluminium rolls, double-sided tape
Description: I changed (temporary) apartment... and I had the problem to cover a brick glass wall which separates my little bedroom from another one. I didn't want to use paints or wallpaper but something smart and low cost.

A friend gave me the idea to cover first the wall with aluminium rolls to block the light. So I unrolled aluminium along the wall, fixing it with double-sided tape.

Then, I took three SNÖVITA gift wrap rolls (5m length) and I unrolled them over aluminium, fixing in the same mode and paying attention to avoid folds.
I chose a creamy-white vertical lines pattern to lighten the bedroom.
And this is the result! Very low cost but perfect for me and my roommate!

Total Costs: 6.5€
- 3 * 1€ (was a special offer!) SNÖVITA gift wrap rolls (5m length) = 3€
- 2 * 1€ aluminium rolls = 2€
- 1 * 1.5€ double-sided tape = 1.5€
See more of the SNÖVITA wall separator.
~ Enrica, Milan (Italy)

Materials: Leftover Cabinet Door, wood burning tool
Description: Buy some leftover cabinet door panels in the as-is section for $1-5.
Use a wood burning tool to burn a design onto said panel.
Art.
Done.


See more of the art on a cabinet.
~ A Nest for All Seasons, Hershey, PA

Materials: Side panels of IKEA floor display bins
Description: Find an IKEA display bin that is missing the bottom. Buy all 4 of the side pieces.
Hang them on your wall.
Buy clothespins.
Clip photos and cards and whatever else you want on your boards.
Sounds simple? it is. ...but Pottery Barn charges $159 for one, so buy yours at IKEA for a song.


See more of the custom clipboards.
~ A Nest for All Seasons, Hershey, PA

Materials: Leftover White Panels (Cabinetry???) from the as-is section
Description: Buy leftover cabinet sections fro the as-is section of IKEA. Make sure they are slick and shiny and white. Bring a dry erase marker to test them out on the sly if you must.
Screw said white panels onto your wall (into studs please!). Cover up the ugly nailheads with pretty buttons or something else beautiful.


Write on your whiteboard with dry erase marker. Erase. Repeat. Rejoice that you have only paid $3 for a whiteboard.


See more of the custom whiteboards.
~ A Nest for All Seasons, Hershey, PA


Materials: RIBBA 50x50, Thinkpad T42, Thick white paper and some pieces of wood.
Description: I used the frame called RIBBA with the size 50x50 cm. There are two models either black or white frame. I selected the black frame for this.
Then as you can see, the inlay have a rectangular cutout and that of course does not fit the laptop screen. To fix this I bought a very heavy paper-sheet (1000g) It's like cardboard, but it's white and stiff 50x70 cm sheet.

The I had an old laptop that I don't use anymore. The battery is completely broken so it can only run if the AC-adapter is always connected. It's an old Thinkpad T42.
Now, we have all the parts lets do it!
Click to read more>>

Materials: Erikslund Ikea Frames, flathead screwdriver, staple gun, staples, photos, photo save adhesive
Description: I purchased 3 of these frames a couple of years ago when they were on sale for 6,90 Euro in Germany. I always envisioned swapping out the photos, but was disappointed when I got home and realized that it wasn't meant for that. So in the closet they went until I pulled them out a couple of days ago.
We've been traveling a lot lately and I wanted a way to display my own photography. Time to dust off the Erikslund frames.
First I resized the photos I wanted to 7.5" x 7.5 inches and printed it out on photo paper
 .
. Using a flathead screwdriver, I pried off the staples on the back of the frame.
Using photo safe adhesive, I carefully aligned my photos. I chose to print them larger than the original images because I wanted them to bleed past the squares when you look at the frames (does that make sense?).
Next I restapled the backing onto the frame. Now some of my favorite shots are displayed properly.

~ Jessica Summers, Illesheim, Germany

Materials: Kolja Mirror from Ikea, 6 packs of 1" tile mirrors and glue gun/sticks
Description: 1. Glue 1" tile mirror starting from the outside working your way inward around entire frame 1x. (only 1 square will be created with the 1" tiles)

2. Next you will only use 12 1" tile mirrors creating an L shape in each corner of the mirror. (there are 4 corners). 6 of the 12 tiles should be glued making the 1st line of the L (like this--->|)...and then the remaining 6 tiles of the 12 will be used to make the rest of the L (like so---->__)

3. For the final step you will only need 3 of the 1" tiles to create a shape like :. This shape will be glued inside of the L shape design which was created in step 2.
4. Attach hanging device and you're done!!
PS. You can also see more pics on my blog.
~ AprilDenise, Atlanta, GA

Materials: RAM Frame
Description: At a Kids carnival the tiny kids creativity booth had IKEA plain wooden RAM Frames with some glitter,stars, flowers and glue they customized the frames to whatever style they wanted and most of the kids remembered their moms. Ah adorable!


~ BBS Alumni Environmental Committee, Kuwait